Whole Home Audio for the Nomadic Lifestyle

I’ve always liked the idea of a whole-home (or apartment) audio setup.  Something about being able to walk around and be able to continue listening to something without having headphones in just seems to really appeal to me. However, as a young person constantly moving for college, work, etc. and some pretty tough requirements for a system, attaining this sort of thing for myself was easier said than done.

Background

Once I had started to consider this for myself, I had seen two setups I really liked: both had wired speakers in the ceiling of each room and one had a central hub in an entertainment closet that controlled the inputs, outputs, and volumes. The other had the input hidden away somewhere and each room had a wall control to adjust volume and turn the speakers on/off.  While both of these got the basic job done, I had some issues with each. The former offered some level of flexibility of inputs into the system, good for switching between a phone, tablet, TV, computer, etc. The distributed control of the latter also appealed to me, because how are you supposed to know what a good volume is for a room you’re not in? Unfortunately each of these systems were not without their faults (at least from my perspective). Primarily there was the price. Each system was in a pretty expensive house, and upon further investigation it turned out that these kinds of setups were indeed pricey. A close second was their portability. At a time when I didn’t expect to be anywhere for an extended period of time, I wanted to be able to take my setup with me, as well as not violate any renter’s agreements by running wired speakers into ceilings or putting holes in walls I didn’t own. Still relevant but less of a factor for me was the controls. While the in-room volume was a nice touch, they still both depended on physically being in one place to do the majority of administration. As someone who’s gotten used to moving between devices, laptop to phone to tablet and back again managing things remotely, the closet control panel felt a bit outdated.

SqueezeBox

Logitech Media Server

Luckily as time goes on, I discover Squeezeboxes. Although this was some time after Logitech has bought and subsequently discontinued the devices, I give them full marks for continuing to provide the server software. Additionally, the community never ceases to amaze me with their hard work, and a number of Squeeze-compatible software players were available.  While the physical devices being discontinued made for a bit of a barrier to entry, my subsequent discovery that squeeze players could run on Linux, Android, and FireTVs meant I could still do some testing, and since I already had devices, ended up being a cheaper alternative anyway.

Unfortunately I had a fair number of issues getting the Logitech Media Server up and running, at least on the low-powered Raspberry Pi I wanted to use long-term, so I hit a bit of a road block, at least until discovering Max2Play, which provided a full image and a click installer to get everything up and running.  Once that was set, I was able to scale up to 4 WiFi devices, plus the local player on the Pi, and was pleasantly surprised at how well they kept in sync.  Admittedly it wasn’t perfect, but with each playback device in a separate room, the difference was negligible.

One gripe I did have while going through this was the actual process of grouping different players together. In a point for versatility, any player could be individually playing something, or part of a group synchronized playback.  What was tough was adding and removing different players from groups because you had to be sure you had selected the right player with the correct playback stream, then remove it from the group.  In the event that your selections weren’t right, you were left wondering what you just did and why the player next to you was playing something from two days ago on it.  I made a mental note that if needed, I should try and code up something to leverage the Servers API and attempt to simplify the process.

In the end, this addressed a lot of my checklist: portability, cost, and decentralized administration.  Where it fell flat for me though was in it’s core function of synchronized audio playback and remote audio playback.  If one device took longer than another to buffer, the latency is painfully obvious and the only way to get them back in sync is to skip to another song and hope they fix themselves.  Additionally, the Media Server has the capability to stream external sources rather than just music files, but due to the amount of buffering required for this, the latency was considerable and made it somewhat painful to use the setup in this way.

One final update for anyone looking to try this out for themselves, with Docker taking over the world, or at least being as popular as it is, getting the Logitech Media Server up and running is easier than ever after a docker build.

Sonos

Sonos

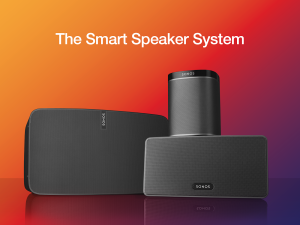
As the Logitech system faded away, Sonos came into view.  I actually learned about them from the TWIT podcasts, where multiple hosts and guests exclaimed it as multi-room magnificence. Of course I had to check it out, and Sonos is indeed a fantastic solution for synchronized audio, with a price to match it. With some outstanding questions on implementation and the ability to tie into Sonos with other systems, I unfortunately had to move this speaker system into the “Maybe Later” pile.  And while their price now may be preventative, I think there’s a good chance that soon they’ll start offering additional value in their products that just might get me to justify the increased cost, but time will tell on this one.

Google Chromecast

Chromecast Audio

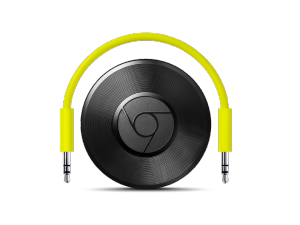
As I’m sure many people could foresee, this trail led me straight to the Google Chromecast Audio (CCA).  When the rumors first started I was intrigued.  Mostly on how they planned to implement the Chromecast experience in an audio-exclusive form.  Would it be over Bluetooth? Just WiFi? Will they synchronize? Questions and speculation swirled, then when they were released and all my questions answered, I figured I should probably wait and see how everything panned out (compatible applications were limited and synced Audios was still in the works), but then my girlfriend surprised me with one!

Initially it took some getting used to. I had become more accustomed to using Bluetooth speakers, but true to the Chromecast way it allowed for distributed control and operated independently of my device.  I set it up in the kitchen since it offered a nice place to seclude speakers and I figured it would be nice while cooking.  As a bonus, the layout of my apartment meant that these speakers could function decently across a large portion of it.  I was pleased with the response times and reliability of the device over time as well.

When I caught wind of the Chromecast app update that enabled Audio groups, I immediately purchased another one to test it out.  The UI was simple enough, and I shortly had a group made out of my two CCAs.  This worked incredibly, both tight, synchronous playback and snappy, responsive controls made it a joy to use.  Since this left me with music throughout my apartment except for one room, naturally a third was in my future.  I guess at this point I should note, this was all possible due to a number of speakers I had acquired over the years.  A few were in use as standalone units, and a few were lent to people who didn’t need them anymore.  They certainly aren’t the best quality speakers, but not being an “audiophile” certainly helps with that, and reusing them definitely keeps the cost down, and makes me feel better about keeping them around all these years.

Needless to say, I’ve been impressed with the Chromecasts, maybe even more so than my video one, I definitely use them more often.  Also, getting the audio coverage I did for under $100 (watch for sales!) is tough to beat when also considering the versatility of control and reliability of the groups (technically the Squeeze setup was 0 additional dollars but lacked these features).  As far as portability goes, I couldn’t ask for much more, unless maybe they made the CCA plug with a pass-through so together with the wired speakers you’d only need one outlet, but I won’t split hairs. All in all, the timing worked out great for me, and this audio solution has been exactly what I was looking for.

If anyone has any tips or tricks from their own experience, or alternatives that I haven’t yet found out about, please let me know! I’m always looking for ways to break improve my current setups =).

Tunnels, of the SSH kind

These days it seems like we all live in the the cloud.  Whether it’s your personal site, email, or photos to show your family at the next get-together, odds are you’re storing something, if not everything, up there.  It’s fantastic! But it’s not everything, and there’s plenty of times when you still need to be communicating with individual machines located anywhere from the same room to across the world.  For that, and so much more, there’s SSH.

Are you telling me to be quiet?

For anyone who says TL;DR to the Wikipedia article, SSH is one of the most simple and secure (if you’re doing it right) ways to communicate between networked devices. Clients are usually available by default on Unix based systems (Linux, Mac, and even the Chromebook I’m editing from) and can be easily obtained for the other popular OSes (Windows, Android, iOS). At the other end, SSH server software is a staple of most, if not all, servers out there, although it may not be enabled by default, so keep that in mind when you decide to tinker.

How I started using SSH

I stumbled upon SSH shortly after stumbling upon Linux.  Since then, it’s only become more valuable for both work and play as I learn additional features of SSH and how to leverage them.  Due to its secure nature, it can be used to encrypt traffic, transfer files, launch remote applications, and even help turn your tablet into a second screen!  And while there are plenty of apps and other ways to do these things, few have the same availability as SSH, especially when dealing with a University or campus network, and potentially even some ISPs.  But today I just want to focus on one aspect of SSH, and that’s tunneling.  There’s 3 kinds, two of which I’m familiar with, and one that has become incredibly useful as my development workflow has changed.

1. When you want it locally, but it’s remote

One thing I’ve found incredibly difficult about SSH tunnels is keeping the syntax and function of each kind straight in my head.  My main use for a Local tunnel is when the resources I need are not accessible to me locally, but I want them to be.  For example, you’re working on an application locally, complete with a local database instance.  You want to move to testing with a more populated database, maybe even your production one, but unfortunately it’s a pain to switch them in your code (at least until that refactor you have planned…).  This is where the “local” version can help, by creating a tunnel to the remote database.  Here’s the syntax:

ssh -L <local host>:<local port>:<remote host>:<remote port> <user>@<ssh server>

Taking a closer look at the command:

  • ssh is the command to execute SSH
  • -L signifies we want a “Local” tunnel
  • <local host> is the host of the computer you will be accessing the resources on, in my examples it’s always your own computer, so this will be localhost
  • <local port> is a port of your choosing to access the resources on, note that this can’t be just any port depending on your permissions, so it’s best to choose an ephemeral port for testing at first
  • <remote host> is the hostname/IP address of the remote resources you’re looking to get at
  • <remote port> is similarly the associated port of those remote resources
  • <user>@<ssh server> finally, this is the machine you have ssh access to, which must also have access to the remote resources you are targeting (note, they CAN be the same machine, and in my cases most often are)

So there’s quite a number of pieces here, so let’s tie it in with the example, say your remote database is at 192.168.1.5:3306, you also have ssh access to it with your user name ‘bob‘ and your application is set up to use a database at localhost:9876.  In this case, your command would be:

ssh -L localhost:9876:192.168.1.5:3306 bob@192.168.1.5

After a successful connection, any data sent to localhost:9876 will be sent through the tunnel to 192.168.1.5:3306, and vice versa.  Note that the remote IP and port are evaluated on the ssh server’s side, so since the ssh server and database server are one in the same, this is also a valid command:

ssh -L localhost:9876:localhost:3306 bob@192.168.1.5

which is where most of my confusion with this syntax comes from… Another great use case for this may help you to remember the nuance.  In this case the remote resource we want to get at is a website, say cnn.com, port 80.  Most likely you don’t have ssh access to cnn.com, so you’ll remember that you have to put cnn.com:80 for the remote information and the ssh server separately, as seen here:

ssh -L localhost:9987:cnn.com:80 bob@192.168.1.5

By navigating to http://localhost:9987, you should see the same information as http://cnn.com.  Note however, that with increased use of CDNs and distributed server environments, you may have trouble accessing certain sites if they see that there’s some discrepancy with the requests, YMMV.

2. I have it here, but I want it to be remote

Remote port forwarding is the killer accessory for my toolchain that I mentioned earlier.  And similar to its name, it does the opposite of local port forwarding.  In this case, you have a resource locally that you would like to make available remotely.  In my case, it’s usually a prototype of a webapp function that I’m messing around with.  I want to show it off to some people and get some feedback, but the team isn’t co-located, so walking around with my laptop is a no-go.  Instead, I can set up a remote port forward to a development machine, send them a link, and they can view it right on my machine.  This way neither of us need to mess with firewall settings, and there’s no need for any special deployments or the time that comes with them.  For remote forwarding, the syntax is as follows:

ssh -R <local host>:<local port>:<remote host>:<remote port> <user>@<ssh server>

As you can see, most of the syntax remains the same, except now there’s a -R to indicate remote port forwarding, the local fields designate the resource you’re accessing, and the remote fields are where others will access the resource.

An important difference here is that by default, the ssh server config doesn’t allow a user to “bind” to interfaces except the loopback address, so you can set everything up correctly and no one will be able to see it.  To get around this, you should specify GatewayPorts yes in the ssh server configuration and restart the ssh server program (my suggestion would be to set this up under a MatchUser section so that this functionality is only available to specified ids).

So once you’ve made that change, say you had a demo site you wanted to show to a client to get some feedback about color shades.  You have the site running locally at localhost:9080 and also have a server at colordemo.com, and you want to make the demo available on port 9090, your command would resemble the following:

ssh -R localhost:9080:colordemo.com:9090 bob@colordemo.com

Now your client can access the demo on your machine by going to colordemo.com:9090, and when they ask you to tweak a couple hex values, you can make those changes, ask them to refresh, and they’ll see it.  They can get instant feedback, and you can keep using your favorite editor to make changes, and no need to wait for a build/deploy.

3. A SOCKS Proxy

The final kind of port forwarding is a dynamic forward. This allows requests to be made by the client, but forwarded to the server who then resolves the requests, returning the information via the secure tunnel.  This allows for things like an impromptu SOCKS proxy, and admittedly I’m not sure what else.  I don’t have much experience with these, so rather than guess, I’ll leave it to you to search out a more informative search for those.

Final Thoughts

So that’s a not so short and sweet low-down on SSH port forwards, but hopefully some of the additional details helps you to understand and remember the syntax for each version.  If this sort of thing interests you, I really recommend getting acquainted with SSH in general, including how to utilize the “escape character” to kill frozen sessions, add in port forwards on the fly, and a couple other useful tricks.  Then there’s fun stuff you can do such as modify the message users see when they SSH into a machine (may I recommend including some ascii art?) which helps keep things fun when you’re in a mostly text world of the terminal.  And finally, if videos are more your thing, there’s a great video that details port forwarding and a WHOLE lot more about ssh called “The Black Magic Of SSH / SSH Can Do That?” which can be found on Vimeo. Thanks!

The Moto X (2014) – My New Phone of Choice

It’s an exciting time right now! After a long, long two years I’m finally eligible for a phone upgrade. While in the process of determining a worthy successor to my Droid 4, I realized just how much smartphones, and my taste in them, had changed in just two years.

October 2012: The yearn for customization

When I could finally afford to add a data package to my cell phone plan, I was beyond excited. A few years earlier, I had begun my foray into pocket computing with a second generation iPod touch, which was then upgraded to a 4th generation to take advantage of some new stuff from Apple. After having jailbroken both of them to get some more desirable features, and with Android getting a better reputation thanks to their release of gingerbread, I realized that Android was really where my heart was.  I was able to snag an original Droid off of ebay for the cost of a couple lunches (an order of magnitude cheaper than my iPods) and after installing Cyanogenmod on it, was satisfied with the performance but completely taken by everything else. The OS was nowhere near as polished as iOS at the time, but it was also much more open to my tweaks and ad hoc enhancements.

After that there was really no looking back. The college student with social media accounts and a borderline obsession with Google searches was ecstatic that he was going to be killing so much time on lines answering emails and scrolling through feeds, and the for-the-heck-of-it tinkerer and tweaker knew that there would be no shortage of opportunity to explore and refine my experience with the open ecosystem – Android it was. The external keyboard and removable microSD card were what sealed the deal for me at the time, both features I planned to use extensively in the coming months.

Motorola Droid 4My 2012 phone of choice.

September 2014: The yearn for cutting edge

Fast forward two years, and my phone has been through quite the overhaul. The quest for features and improvements has led me to adopt Cyanogenmod 11 in the absence of updates from Motorola/Verizon, and the immense amounts of customization available for Android has allowed my homescreen to adapt to my needs. But the biggest issue as of late?  My phone is old, and it’s slow. The custom ROM breathed new life into the device, but regardless, it’s showing its age.  Luckily, it’s a quality product and I’ve been able to continue to use it, however at times it has become more of a chore than an experience.  I’ll often go retrieve my tablet (or laptop if it’s on) to perform some task because I know there’s a chance my phone will give me some sluggish response time, even if it’s in another room (dramatic I know…although more beneficial from a health standpoint until Google Fit and Apple HealthKit get up to speed).

So since I’m about to head into another two-year commitment, I wanted to be sure that my new device, which is sure to be amazing at the start, would still be amazing a couple years down the road, or at least not almost obsolete. In addition, my personal use cases for my phone has altered a bit, for example, the slide-out keyboard is hardly utilized anymore (save those times I really need to SSH into a machine while on the go), my microSD card consists mainly of music and is accessed less and less frequently (the “shuffle-all” setting is just an invitation to hit next for an hour), and I wanted to increase my screen size (studies have shown this is a common trend, as clearly evidenced from Apple’s latest  phone behemoth).  These trends line up with the trends of the smartphone market in general, allowing my personal tastes and a company’s flagship phone to line up more easily.  Why flagship? Because those are the devices that get all the attention (attention = updates), and the ones (in my experience) that user’s are continually swearing by even years after their release.

So really my choice became clear once I knew that I wanted a flagship Android smartphone with no shortage of customizations: the Moto X. Coming from a Motorola phone, I can appreciate the almost-stock experience it provides, and the sheer level of options afforded through Moto-Maker are sure to provide me a unique phone from start to finish. The added voice and notification features, combined with some trend-setting inclusions such as Trusted Bluetooth devices are all just cherries on top.

Will it actually withstand the test of time?  We won’t know just yet, but from past experience, I think the 2nd generation Moto X has a lot going for it (maybe enough for me to be more verbose about it once it’s in hand), and it will sure be a fun ride along the way!

Moto X (2nd Gen.)

My new phone of choice!