I’m an admin for a Facebook group called The Connoisseurs of All Things Teaching, Learning & Student Success Related, and we had this webinar posted today on our group by one of our members. I thought it was worthy of a share on the blog.
Category Archives: Keep Teaching
Setting that aren’t easy to find in Zoom
Zoom has a lot of features.
A
Lot
Some of them are not by any means easy to locate. I mean, even not easy enough that I may have told you that apparently we didn’t have access to those features.
So here is the issue. You need to create the zoom meeting room through blackboard. That way it is tied to your course, and has all your students getting easy access. But after you save the room:
Leave Blackboard.
Go to stonybrook.zoom.us and login back in
To find the option for preassigning break out rooms:
and click on Meetings and find the meeting room you just made.
Click on it’s name and then go to the bottom and find Edit this Meeting.
Towards the bottom, in the Meeting Options section, you will see Breakout Room pre-assign. This lets you create the rooms manually, or with a CSV file.
ALSO FOUND HERE: What you need to stop ZoomBombs:
Anyone can share the link to the meeting. It can even be a student in the class that is signed in from another device doing the trolling. The only way to stop this is to enable the authentication profiles and force them to use a specific domain account. We have done just that so you can add it to any of your meetings. Simply go into the meeting options and check the “only authenticated users can join” option. Please be sure to leave the domain as stonybook.edu. I am including a screenshot below. This will force them to use a stonybrook.edu email address and they can no longer be anonymous in the session.
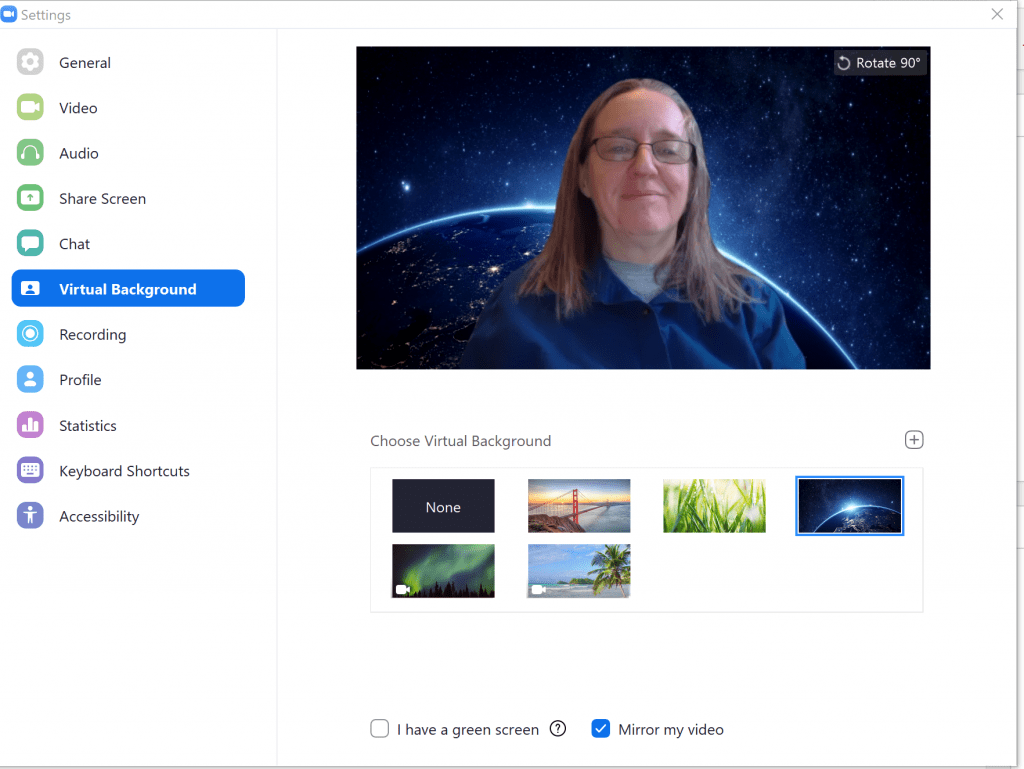
Set a Virtual Background, Controlling who can share screens, send invites to meetings in different languages, etc:
Go to Settings on the left menu and dig through this area. Note that some options are locked by “admin”.
Actually choose the Virtual Background:
This must be done in settings in the Zoom application. (Oiy!) It will download a virtual desktop package to your machine the first time.
Leave some comments below if you find more “hidden” features in zoom!
tip or trick for scanning pdfs at home
![]()
Concerned about exams at home?
Respondus has kindly fully opened up the licensing during these interesting times for their Monitor software, which uses a webcam for remote proctoring.
If you are concerned about how to have exams online, you will probably want to attend one of these webinars found here.
Here is an additional youtube video on the topic:
zoom recordings for educators, admins, staff and students
grabbed these from a Blackboard listserv:
· Zoom 101: Sign Up & Download<https://success.zoom.
· Zoom 101 : In Meeting Controls (Basic)<https://success.zoom.u
· Comprehensive Guide to Educating Through Zoom<https://zoom.us/docs/doc/
·
· Tips and Tricks for Teachers Educating on Zoom<https://zoom.us/docs/doc/
· Tips and Tricks for Administrators and Staff<https://zoom.us/docs/doc
· Student Tips for Participating in Online Learning<https://zoom.us/docs/
· Live Training<https://support.zoom.
· Zoom Meetings for Education Training<https://livetraining.
Polling in Zoom
our account login is stonybrook.zoom.us
Breakout Rooms in Zoom
Google Hangouts/Meet now has recording at SBU
Just turned on!!!
Read yesterday’s post on using web conferencing for step by step info on setting up scheduled meetings from your google cal.
This is a coronavirus contingency action and not permanent. Please read more about it here.
Auto Grade Large Class Submissions
For this tutorial we will look at how to auto grade a very large class, after they have completed a blackboard assignment submission.
This is the scenario I am envisioning, and hopefully it will give you some ideas of how you could use this for your large class. A large lecture Chemistry class has just received a problem to solve on paper. Perhaps they have to show covalent bonds or something of that nature, but the real important thing is that they are producing a hand made image (could be from there touch device too) and they are going to send a screenshot or photo of their sketch to the instructor via blackboard. The instructor, wants to grade them for their participation in this activity.
So first step is to create the assignment.
Login to Blackboard with your NetID and password. Go into your course and then to your content area where you have your assignments listed. Create the assignment:
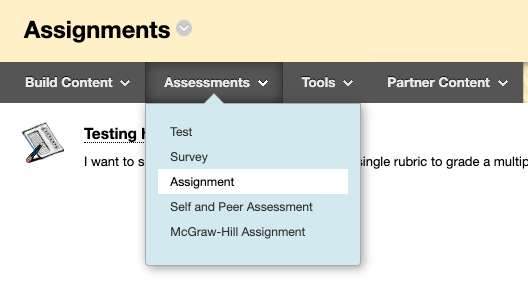
Use the Assessments pull down menu and select Assignment.

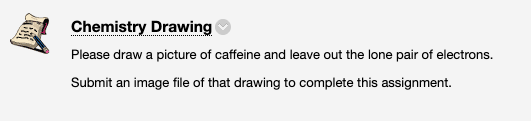
Give it a name and clearly tell the student what you want them to do – including that you want them to submit back to you this file with the drawing.
The student clicks on the assignment, and clicks Browse My Computer to upload the drawing.
They see this Review Submission History:

If the student clicks on the SUBMISSION link, they can view their masterpiece:

Now.. you have gotten your hundreds of sketches back through the assignment and it is time to grade them.
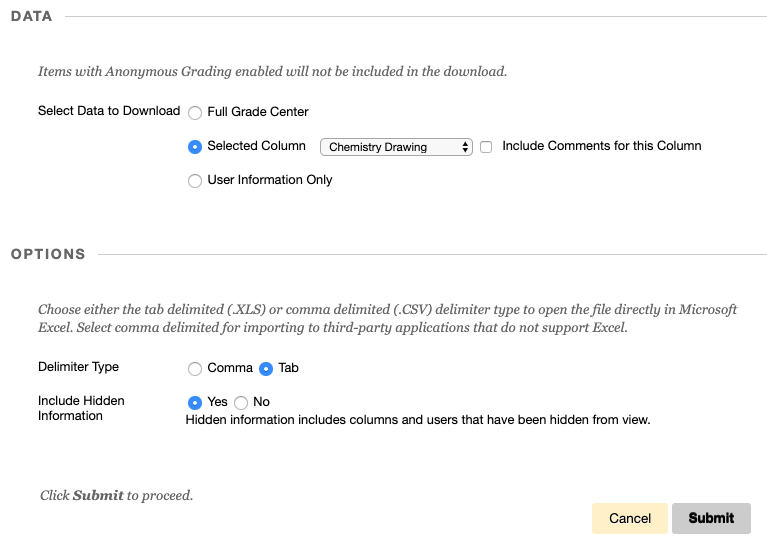
Go to the Grade Center and click on the Full Grade Center. Now click Work Offline -> Download.
DATA
Set the download to Selected Column
OPTIONS
Set Delimiter Type to Tab for OSX and to Comma for Windows
Set Include Hidden Information to Yes
Click Submit
Click Download

Open with your favorite spreadsheet program. Every student who submitted a file in response to your assignment will have the words “Needs Grading” in the spreadsheet. Those that did not submit the assignment will be blank. Find and replace “Needs Grading” throughout the spreadsheet with the point value of the assignment. In this case my point value will be 5.
Now we save the file – keeping either tab or comma delimited as indicated when you downloaded the file. Go back to Blackboard and back to the Work Offline menu, selecting Upload


Browse My Computer for the file. (I have a Mac, so mine is a .tsv file)
Click Submit
Now in your grade center, every student that had Needs Grading, now has a 5.
Two Ways to Recycle Older Echo360 Content for Online Usage
If you were the primary instructor for a course within Echo360 for a prior semester’s recordings, you can easily reuse those recordings for this semester.
First option: Just put the entire semester into this semester’s blackboard.
You will want to login to Blackboard, go to the course area that you want your link with Echo360 to appear (typically some content folder) and “Build Content” -> “Echo Cloud”.

Now give the link a name. This may be something like “Course Videos”, “Video Lectures”, etc.
Click “Submit”.
You now click on that link you just made.
Connect your Echo360 Content

Select the Term, Course and Section that your want to reuse from.
Now Click the lighter blue button that says “Link Content”

The entire list of videos from the older class will now appear for your students.
Option 2:
Curate the videos that you want your students to use from your Echo360 Library.
For this, you will login to echo36.org with your netid and password. [If you are not currently using Echo360 for your current course, first make a link to the section you’re teaching now by following these directions and then come back to these directions. Alternatively, contact tlt_its@stonybrook.edu for assistance in creating the section.]
Select the tab “My Content”

Hover over the video you want to use, and “…” will appear in the lower right, select “Share”.

from the Share Settings screen you will find many ways of sharing the video. We are going to use the “Class” option.

Select the current course that you want this video to be loaded into. Select New Class, name the topic of the class, the date that you expect them to view it, describe it if you want, and make decisions about when you want the video to be available to view.

Do this for all of the videos that you want in your blackboard site. When you check the link you created in the blackboard site, you will see all the videos you chose listed.