As detailed in my previous post, I am using the Google Camera App on my Samsung Galaxy S5 to create Photosphere images of the places at the School of Marine and Atmospheric Sciences and other parts of the Stony Brook University campus.
A photosphere can be created by simply moving your phone around to the dots indicated on the screen of your smartphone. Unfortunately, creating a freehand photosphere can produce stitching issues between the individual images–jarring lines that show the viewer that the image you created is not a seamless environment but a set of photos pieced together.
To truly create a proper photosphere that has minimal stitching errors, your phone needs to be placed in a controlled mount where the camera lens stays in roughly the same position for each individual shot. A tripod keeps the camera in place, but in order to capture the upward- and downward-facing images, the smartphone needs to swivel–and the lens needs to remain in roughly the same position.
The first photosphere mount I created was built out of rubberbands and wood. The rubberbands held the phone in place and the wood frame was easy to modify without needing any metalworking skills. And it took great shots! The wood was taken from a Melissa and Doug bead set box, with the base removed and the rubber bands were in a drawer, so the cost for parts was $0.00. It was a perfect first test that allowed for a few shots to be captured to great results. The Mark I photosphere mount still exists and the rubber bands remain intact.
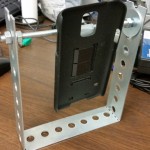
The Mark II introduced a metal frame, built from Home Depot Slotted Bar Flat Steel, 48″ x 1 3/8″ x 1/8″, SKU 887480020670. A 1/4″ threaded rod secured with 4 1/4″ hex nuts and 4 5/16″ Fender Washers provided the swivel mount, coupled with a Samsung Galaxy S5 smartphone case secured to the threaded rod with a computer expansion port cover. The Mark II wasn’t perfectly aligned with the camera lens, but it still created a good photosphere. The smartphone case and threaded rod still exist, but the metal frame was used in the Mark IV design.
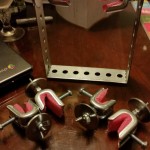
The Mark III replaced the threaded rod and smartphone case with two machined aluminum grips that could be quickly adjusted and tightened on the smartphone. It was tested with the Samsung Galaxy S5 and S7. The thicker OtterBox-like cases needed to be removed for the S7 in order to secure the phone in the mount. The machined aluminum was created by the SoMAS facility manager Mark Wiggins, and the pieces are expertly created. The aluminum secures to the mount with a threaded rod insert that is cemented into the machined aluminum. A fender washer, hex nut and a pair of wing nuts secures the mount.
The Mark IV aimed to replace the machined parts with off-the-shelf parts available at Home Depot. A steel 1/4″ – 20 beam clamp coupled with a 1/4″ – 20 x 1-1/4″ machine screw, 3 1/4″ hex nuts, 2 5/16″ fender washers and a wing nut completes the mount on a one side. Some foam was cut to protect the phone in the mount and the machine screw keeps the foam in place.
The gallery below showcases each version of the photosphere mount.
Google Cardboard Presentation


