For instructors concerned about hearing student questions, here are some options:
1) Students can post questions through Zoom chat, which may be used to stream to students
unable to attend anyway. Or if you are streaming live through Echo, they should be able to post questions there. If you don’t have a TA to moderate, perhaps ask a few students to alert you to posted questions.
2) Instructors can create a room in gmail that is used for students to post questions during the lecture. The TA could then moderate.
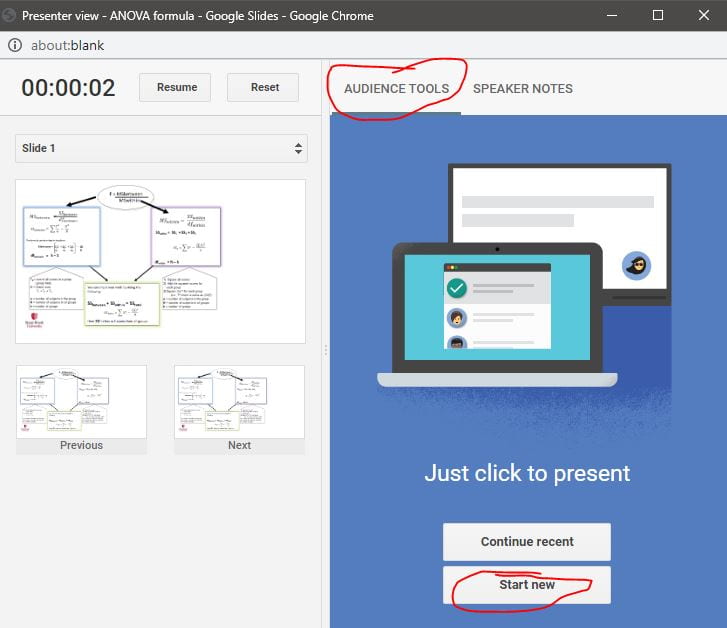
3) Google slides integrates the “where to post your question” with the slide you are presenting.
In google slides find Present
Click the down arrow, and then click presenter view.
Click on “Audience Tools” and then “Start Here” below
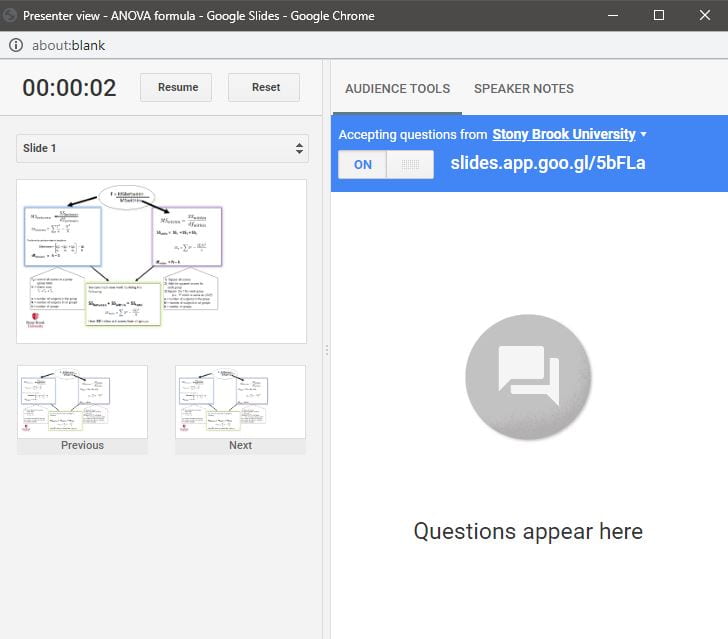
You will then see the following window with a chat box for posted questions.
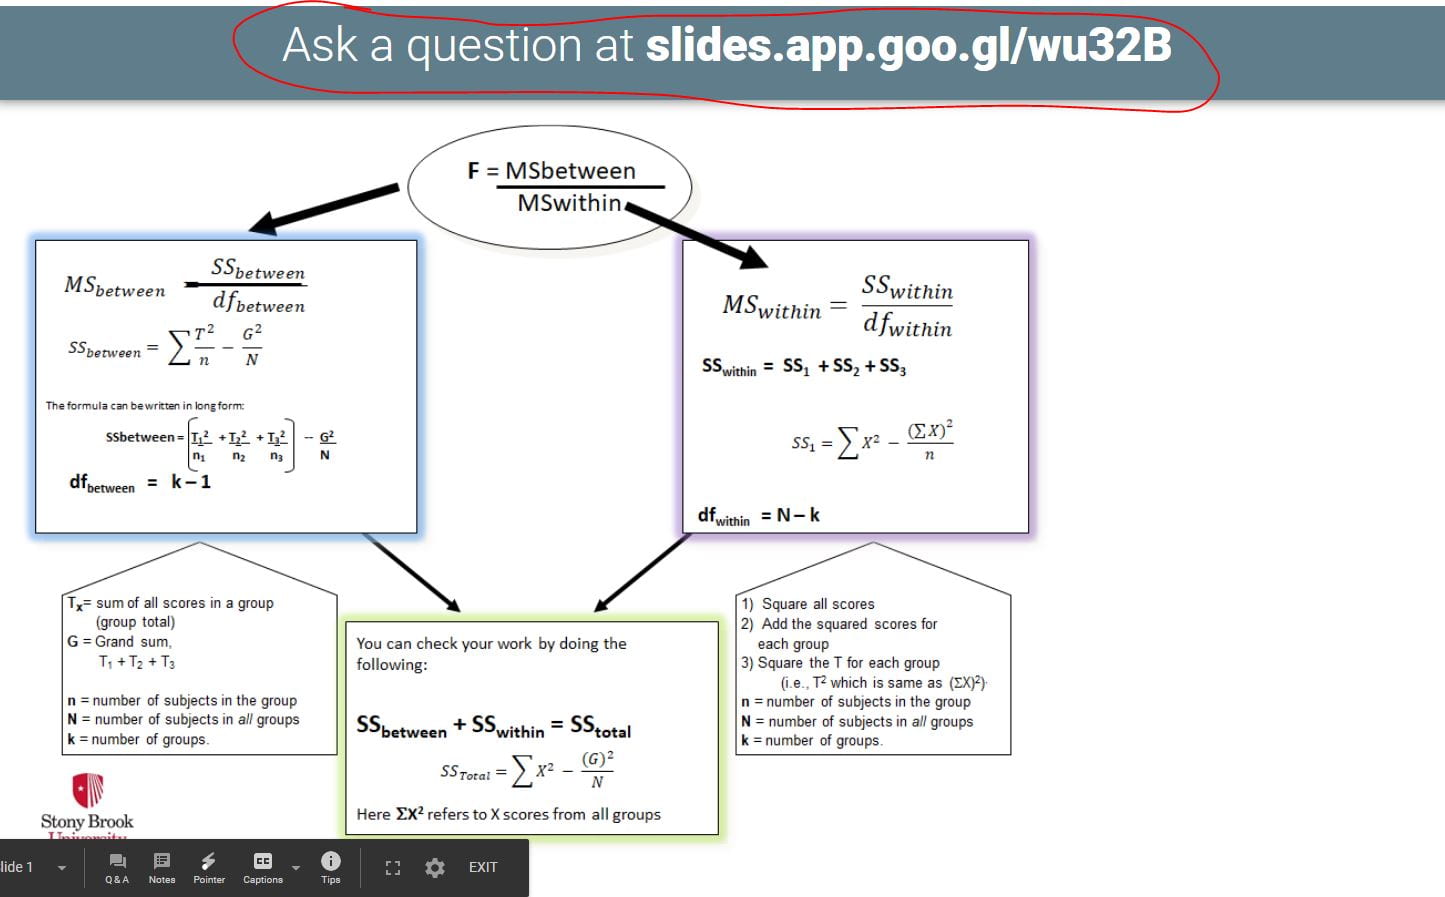
If you present through google slides, your students will see the link for posting questions at the top of each slide (as long as you keep the “on” clicked above the chat box).
If you don’t want to convert your ppt slides to a google slide set, copy the link and post into the header or foot of your ppt slides and keep the google slide presentation open in the background, with the chat window showing.
1) YouTube. Advantages: Rapid uploads, easy to embed
I recommend posting videos as unlisted and solely for your students. If you have included copyrighted content sure to include “This video is for the sole use of students enrolled in XXX XXX at Stony Brook University as per the TEACH Act.”
Unlimited free space.
Although video length is reported to be limited, I’ve yet to have a long video lecture rejected. They can find copyrighted content, but as long as you keep the video unlisted you can use it. Make sure you note the video is educational.
2) Vimeo,
Advantage: allows passwords so you can control who views. However, if you use a password, the title slide doesn’t show up when you embed the video in the LMS. To work around that, post a title image (include the password), and then add a link to the Vimeo video
Vimeo is GREAT. It has many wonderful features, but very limited free space.
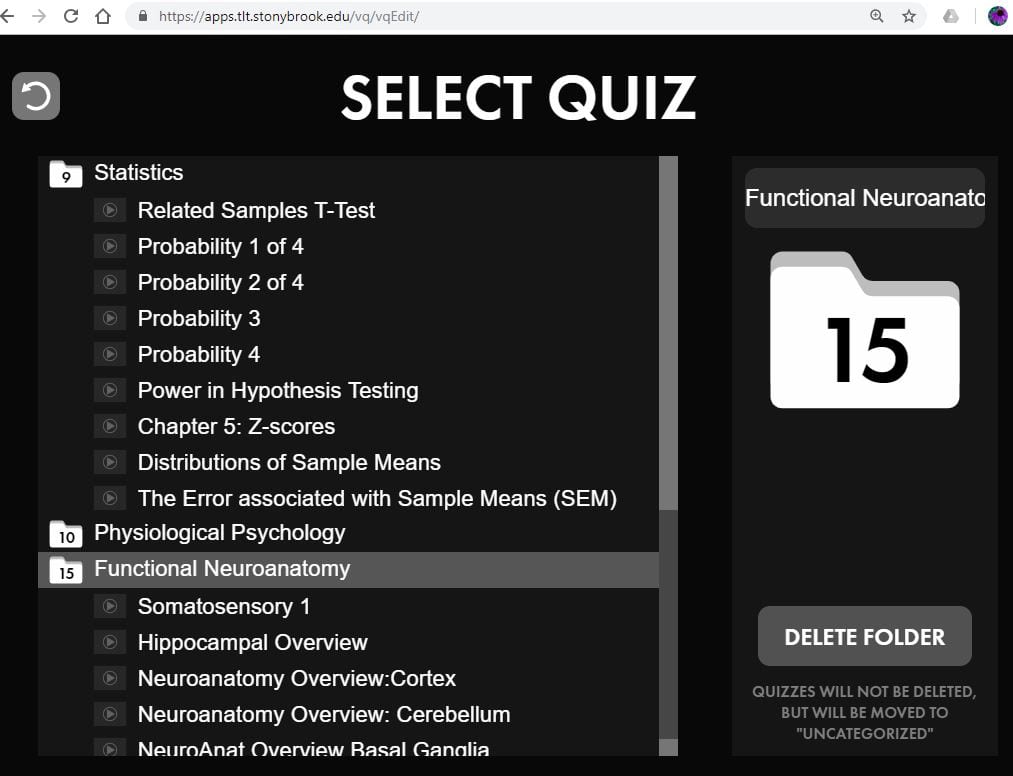
3) IVQ developed at SBU
Advantages: a) only people at Stony Brook have access to your videos.
b) allows Quiz Embedding so student can access rapid feedback on understanding.
c) Allows you to hold students accountable for viewing lecture videos. Provides individual student statistics on viewing time and number of mistakes, or scores can be automatically uploaded into the Blackboard gradebook.
This is a snip of the IVQ excel file.
d) Provides folders to organize videos.
Disdvantages: None.
To embed videos in Blackboard see the following post
Light boards allow you to make a video with no training! Someone else has taken care of everything, including lighting, hardware, etc. All you need is a USB stick, a script and a finger to push the button! You can produce a highly professional polished video easily.
Here are a few tips.
Bring a buddy to press the button, and possibly hold cue cards.
Fully develop and practice your script.
Break the script (even a simple short one) into small bits.
Record each part individually. Clap at the beginning of each in case the audio and video are slightly out of sync. This will speed efforts to synchronize later. Repeat for the next part.
Consider either a stance to end and start each portion, or plan to put a sign in each break so that the audience doesn’t notice the visual shift in the presenters position.
Keep looking at the camera through the whole piece, from beginning to beyond the end. It will be tempting to look at the person pressing the button. Don’t.
Don’t change pen colors. It takes extra time with little effect. If you edit out the changes, the posture shifts are noticeable.
Use software like Camtasia to put all the pieces together. Add titles between parts to obscure the postural shifts from splicing.
Blackboard offers some nice one stop features for adding videos into course content areas. However, I find the video frames for the YouTube option too small for the detail I need my students to view. For that reason I use a more manual method that provides more flexibility
To embed YouTube videos
There is a one step method for linking to YouTube videos in BB, but it does not not allow unlisted Youtube videos. If you keep your videos unlisted and/or want to control the size of the image in the content window, use one of the following methods.
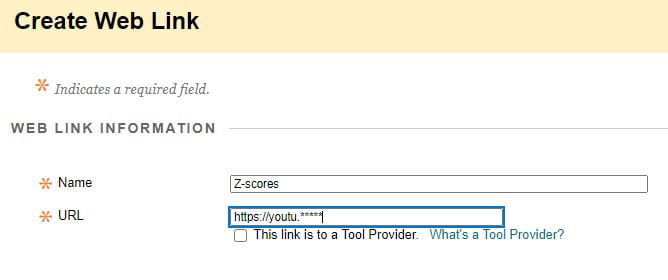
METHOD 1: FAST WEBLINK
Go to the video in YouTube and hit “share” and then copy the link.
Go to the content area in Blackboard and within the correct folder, click Build Content and then Weblink.
Fill in the name and UR>
An item like that seen below will be added to the bottom of the list, move to postion.
METHOD 2: LONGER but VISUALLY MORE INTERESTING AND EASIER TO REMEMBER
Go to the video in YouTube and hit “share” and then “embed.” Copy the embed code.
Go to the content or modules area in Blackboard and the folder you want.
Click Build Content and then “create item”
Name the item
Hit the “html” button in the menu above the blank content window.
Copy in the embed code from YouTube video.
Click update
Hit the html button again if you want to resize the video. 560 is a good width. The height will adjust automatically.
click update and submit.
It should look like video shown in the black frame below. When the students click on the arrow, the video will open.
Interactive Video Quizzes
For Stony Brook Interactive Video Quizzes (IVQ) with automatic score upload to the Blackboard grade book
Go to the video in YouTube and hit “share” and then copy the link.
Go to the content area in Blackboard and within the correct folder, click Build Content and then Weblink.
Fill in the name and UR>
Click “This link is a Tool Provider”
Then click enable evaluation
Add points possible
Make visible to students
An item like that seen below will be added to the bottom of the list, move to position.
along with any description you might have added
OPTIONAL
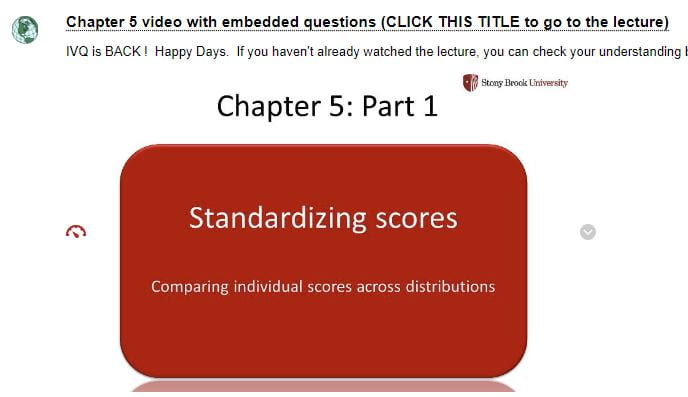
If you want a picture to make the item more memorable, like this
Then add and image by clicking on the circled icon below
Browse your computer to uplod the image
click appearance to change the size
Click Insert
Then Submit
The item will be at the bottom, move into proper position
If you prefer to embed a video from the SBU IVQ system, and you do NOT want scores uploaded but you want students to be able to click the picture to go to the video:
Make a title slide by either copying an image from the video or producing one in powerpoint.
Pull the image into powerpoint and add an arrow so students recognize it symbolizes a video. Save as a .jpg file
Go to Blackboard and the content area you want to post within
Create an item
Click on the image icon to add the title slide.
Click “Browse my Computer” and find the correct image
Go to the second tab, “appearance” and choose the dimensions (e.g., 560 width is good)
Click insert
Once the title slide is added, highlight it and click the link icon.
Copy the web address for the IVQ video in the “Link path”
Be sure to use the address from the “Copy Address” button in IVQ
Do NOT use the web address in your browser, because that is the edit file that students cannot access.
IMPORTANT: After inserting the correct address, go to the “Target” area and choose, “Open in a New Window” IVQ won’t work with Blackboard if you do not do this.
To embed scripts to accompany videos, follow these directions.
You may have taken a Coursera course and seen the script embedded just below their videos. Scripts allow students to quickly search for content without hunting through the video timeline.
If you have a script, it is easy to embed it in Blackboard.
Copy your script into a google doc in your Google Drive
When completed, go to “file” and then “publish to web.”
Hit “Embed” It will ask you if you are sure you want to make the material available, say yes.
Copy the embed code
Go to Blackboard and the content location for embedding
Click to edit the item
Then click “html” (see above for the button location)
Add the embed code
Click update
Check the size. If necessary click html again, and adjust the width and height.
If you are recording a lecture for class, you are likely to record with a webcam or relatively cheap headphone/mic combo. That is fine until you find yourself recording frequently and are ready to step up your game. Or more likely, you are just tired of picking up your headphones and getting variable sound output because of differences in battery charge. If that is the case, then it is time to get serious about microphones!
If you need just a bit more rationalization to justify buying equipment, then consider that people will tolerate worst quality video images more than poor quality audio (http://www.thesunchronicle.com/video_class/importance-of-good-audio/article_b353e69c-9424-11e3-98e7-001a4bcf887a.html).
If you aren’t yet convinced to open your wallet, then think about the time you were ready to record only to find loud voices outside your office, or the lawn care team showing up outside your home office. A new microphone might be the ticket to being able to record regardless of background sound.
What would I buy: Dynamic or Condenser?
You can watch YouTube videos on microphones to pick out a great one, but you are more likely to suffer from analysis paralysis. Before you decide what to buy, you have to decide which type of microphone to buy. Your first choice is dynamic or condenser microphone. For the difference go to this Rode site: http://www.rode.com/blog/all/dynamic-vs-condenser-which-live-mic-is-right-for-you
You can never tell who is paid to promote a microphone so another clue for quality is to find out what your favorite YouTuber uses. Which microphone produces sound that feels like it is in the room with you? (e.g., http://www.rode.com/microphones/procaster.) You can also find websites that compare microphone sounds (http://www.rode.com/microphones/procaster).
At the time I was looking there were two highly promoted options, the Rode Podcaster and the Blue Yeti. The former is dynamic, the latter a condenser microphone with some very cool features.
If you are ever tempted to have a conversational podcast with one microphone, then the Blue Yeti may be for you. On most occasions for educational videos, however, this condenser microphone is going to require some audio processing because it will pick up background noise. Some people work around this by building miniature sound isolation boxes (https://www.youtube.com/watch?v=UTeUeRxAS7M). The procaster or podcaster has the advantage of being a dynamic microphone that picks up only sounds close to the microphone. While you can avoid some basic audio processing, keep in mind it won’t work well as a microphone with a teleprompter. It will likely be in view of the camera frame.
Rode podcaster and procaster are dynamic microphones (http://www.rode.com/microphones/procaster) that avoid the need to reduce noise after recording. Instead I can record directly in Camtasia and the sound is clean (no lawn mowers in the background!) The procaster is a beast at 1.6 lb and 8 inches long. You won’t be tempted to carry it around. If you need a portable microphone, consider other options.
If you need to process audio, consider taking Paul St. Denis’s CELT workshop on Audacity
Audacity is free audio processing software. You can use it to reduce noise
Should you add music?
Save time and skip the music. If you must, then use it at the beginning and end. It is tempting when you use Camtasia, which has music files integrated. They provide easy intuitive options for fading and amplifying music.
You may be thinking, “it sounds so nice with music behind a voice!” Yes, but you may have to notch the frequencies of your voice out of the music track to allow your voice to truly stand out against even low volume music. So skip the music, because you don’t have time.
Software that simulations drawing images you want to illustrate.
For example: https://www.youtube.com/watch?v=1ShZePgxwrg
Video 1
Why?
Like a drawing in person, the hand keeps the student focused on the region of the drawing being discussed at any time. It allows for the student to follow the order of the process.
In contrast to the image of you drawing on a camera, there is room for revision and reorganization.
What is static in powerpoint can be dynamic in Videoscribe. You can show process or steps. Students will be able to follow along.
It is intuitive
No additional hardware is required (e.g., no tablet).
The images that come with it are great for simple diagrams, like lines, circles, arrows and text.
Using more complex images
You can also pull images (e.g., graphs) in, but they will be inserted, not drawn.
Inserting .svg images allows the drawing of more complex diagrams and pictures.
Inkscape allows you to draw and save .svg images. It is free! (For more see below).
Ordering the process correctly saves time
Narration first. The software comes with a microphone to record narration.
Record narration, then insert the visual parts.
All narration is recorded at once, not in parts.
Advantage: your voice will sound consistent. Disadvantage: it may take a few tries to record the whole narration perfectly.
Hack: Record on other software that allows you to edit out mistakes. Upload the recording to VideoScribe.
3. Visuals. Adjust the timing of each visual bit to fit the narration
If you have Camtasia, consider developing only the visuals in Videoscribe. Then dump the .mpeg rendering into Camtasia, where you have more flexibility for recording narration. If your video is switching images before the narration moves on, just cut the video clip and extend the frame to end when the narration ends. Alternatively, slow the drawing by slowing the clip speed.
4. Render the video.
To post on YouTube or Stony Brook’s IVQ, you likely want an .mpeg or .mp4 file as your output. For complicated, but very legitimate reasons this takes a long time on Videoscribe. A faster workaround is to Screencast the raw version as you play the whole story within Videoscribe. Then render within the screencasting software (e.g., Camtasia.)
Going Above and Beyond
If you combine VideoScribe and Camtasia then you can add highlights or alter the magnification in Camtasia. For example in minute 14 and 15 of the ANOVA video above (see Video 1), Camtasia was used to add a table to the video while blurring out the rest of the image, and to highlight the areas used as sources for the information while the values were added to the final table.
For more sophisticated designs there are additional tutorials
Using existing images.
You can import existing images into Inkscape, and then draw over them. Draw the objects in the order you want Videoscribe to draw them.
If you want to control the timing of each object, you may want to draw the whole object, save multiple copies, then delete everything but a single part and save in a separate file.
Then pull each objects file into Videoscribe. For sizing, import the original object, and place it first so you can size objects to it. Later delete it.
Import, size and order each object, then revise the timing of each.
You can also convert .png images to .svg images, which can then be imported into VideoScribe
If you have decided to make an educational video, you might wonder whether you should record yourself speaking to the camera. Thorough analyses of online course outcomes by Columbia University suggest that online students value interaction, and student performance is correlated with instructor interactions (Creating and Effective Instructor Presence: https://ccrc.tc.columbia.edu/media/k2/attachments/effective-online-instructor-presence.pdf). Although live audio and video chats were ideal, students also had a higher level of participation when faculty used video-capture lectures. These left the students feeling they had a stronger personal connection to the instructor than simply viewing lecture notes online. Interpersonal interaction was the strongest predictor of student grades. The level of interaction, from low to high was related to variability of course grades that spanned a whole letter grade! (see reference above, graph page 2).
The disadvantages of filming yourself.
-People tend to watch people instead of the content. So your face will distract from the material
-Images may date faster than the content.
-Without a teleprompter, you will be looking at the screen and not the camera.
-When you make a mistake that has to be cut out, the film image will shift quickly.
A solution
Film yourself introducing the video, and summarizing the points at the end, but leave the middle for content. If you are missing visuals in the middle, fill the space with the video of you speaking. This allows provides presence without distraction.
Going a step beyond: Build a teleprompter
If you want to be present throughout, and you want to look straight into the camera, then you might be interested in building your own teleprompter. It is much easier than you think! There are numerous YouTube videos on this topic, with just one shown below.
If you have a tablet, you can usually find free teleprompter software. If you have an old picture frame, a few hinges and a base, you are 99% done! I built mine for less than $5.00! The trick is getting your camera and teleprompter to work together. A good webcam on a solid mini-tripod should work.
Pearson Ed is reporting that “Gen Z believes YouTube is a bigger contributor to their education than textbooks.” (https://www.axios.com/youtube-education-teaching-students-generation-z-fa60d828-2492-42d0-9102-3edb1a59592e.html) Just as images became more widely available to academics in the late 90s, videos are now widely available. Accordingly, students expect to learn from video.
For context, consider that humans have been around for 200,000 years, but existed in a text-based world for a mere 600 years. We evolved to process moving 3-D objects, and therefore movement is a salient feature for visual perception.
Videos have additional value for reaching the five to ten percent of the population that has dyslexia, which makes reading difficult. Robert Rauschenberg, one of the most influential American artists of his time, was profoundly dyslexic. He said, “The possibility exists to nourish an important new genius in learning-disabled children, if their spirit is not broken and creative dreams are allowed to develop” (Personal Stories: Robert Rauschenberg, By: Robert Rauschenberg, LDOnline). With videos we reach those geniuses who draw in the margins while struggling with text.
If you choose to use videos, should you make your own?
Making videos can be very time consuming. If you teach lower division courses, you should find videos already developed and available online. Save yourself time, and find one.
Remember that as an academic your search for videos may yield scholarly content rather than educational content. Ask students to search and recommend videos, then curate their recommendations.
If you decide to make your own video
The first question you should ask yourself is whether images are necessary. If you can describe everything verbally then podcast! Synchronizing narration and images can take extra time so if you don’t need images, just record the narration and stop there. Podcasts of often more accessible. Students can listen while in transit.
If you need images, and your content is specialized (e.g., in an upper division course), then create your own video.
Your options for creating videos
Solutions/Stategies
Advantages
Disadvantages
1 Record narration in powerpt
Fast, familiar, cheap
Can’t post on a video site. Can’t hold students accountable for listening.
2 Cell phone recording
Fast, familiar, cheap
Low quality, need lighting
Automatic gain turn paper 18% gray so videos appear dark.
3 Echo Personal capture
Fast, free
Limited editing the last time I tried, which was awhile ago.
4 Camtasia
Flexible, fast. Great editing, extra features (e.g., ,music, transition functions). Easy to learn
$180.00 (Educational Version)
5 One Touch Studio
Fast, high quality for short videos
a) completely set up
b) easy to schedule
c) professional output
d) no need for training
Would be difficult for a whole lecture. Use instead for short, focused tutorials.
The Anderson lab is interested in understanding how experience shapes the brain and behavior. In the past, we used voluntary and forced exercise in rats to model the effects of exercise in humans. We have also used corticosterone injections to mimic the effects of stress.
More recently, we have developed a novel living environment for rats that allows us to systemically manipulate environmental factors that produce stress, and test for stress-related behavioral and neural adaptations. This environment has allowed us to test the effects of psychological stress by repeatedly presenting threats without harm. Repeated unpredictable threats produce a pattern of adaptations that parallels the symptoms of PTSD without giving a traumatic event. We are currently studying whether these environmental conditions play a role in producing vulnerability to PTSD.
To achieve our goals, the lab integrates three general approaches: behavioral analysis, quantitative anatomy and quantitative histochemistry.
Behavioral approaches are used to establish effects of stress and exercise on subsequent behavior in rats. For example, to test whether exercise or stress affect memory, we use the Barnes maze, Y-maze or the radial arm maze. Using the Barnes maze and the Y-maze we have tested whether the stress-related hormone corticosterone impairs spatial memory (Coburn-Litvak et al., 2003), and more recently we have shown that threats without harm impair memory when tested in basal test conditions, but not when tested in high stress conditions.
We have also tested whether corticosterone administered over long periods or repeated threat exposure affects anxiety and anhedonia (Gorby et al., in preparation; Kim, submitted). We are currently developing a toolkit that will allow us to test numerous behavioral features of anxiety.
Quantitative anatomical analyses are used to determine whether or not exercise, stress-related hormones or stress have an influence on capillary density, tissue volume and synaptic numbers in the brain. All of these variables would be expected to influence brain function and vulnerability. For example, we have shown that two-month administration of the stress-related hormone corticosterone (40 mg/kg) causes neuropil volume reduction and synapse loss in hippocampal area CA3 (Tata et al., 2006).
Cytochrome oxidase in a coronal section of a rat brain.
Cytochrome oxidase histochemistry provides a measure of metabolic capacity. When neuronal activity is increased or decreased, cytochrome oxidase is up/down regulated. Therefore, this histochemical stain can be used to identify areas activated by experience or a task.
Our findings have implications for the impact that lifestyle choices have on brain development, brain aging, and behavior reactions to stimuli.