
IMPORTANT MESSAGE: May 24, 2020 Effective immediately, Senior Hospital Administration has asked us to stop making the surgical masks at this time. The Hospital has started receiving regular deliveries of PPE. Please know that any masks delivered to us will be delivered to the Hospital. Senior Administration would like us to let you know how grateful they are for your commitment to helping the hospital staff at a critical time. Email notification will be sent out soon with more details. Thank you for a job well done.
ATTENTION: THIS IS THE STONY BROOK HOSPITAL-APPROVED MASK STYLE
PLEASE DO NOT FOLLOW ANY OTHER DIRECTIONS OR STYLES AS THE HOSPITAL MAY NOT ACCEPT THEM. The material or mask do not need to be cleaned. The Hospital will be sending for professional cleaning and will be packaged.
MATERIALS NEEDED
You will need fabric for the front and fabric for lining. NOTE: if you do not have white fabric for the lining you can use the same fabric and use it with the inside out. This is needed so that the user always uses the inside of the mask to the face.
Fabric for front of mask. This fabric can be any Cotton or cotton blends such as
Cotton/polyester and can be with prints or solids.
Fabric for Inside of mask: This fabric white white cotton or cotton blends such as
Cotton/Polyester. Preferably white but any solid color will do. Backing for quilts would be perfect.
Elastic: Elastic needs to be ¼ inch wide elastic. Two pieces 20” each for Adults and 15″ for Children (will be provided for you)
TEMPLATES/PATTERNS FOR CUTTING THE MASK
Click HERE for adult size to open and print the mask pattern Click HERE for children
EMAIL maryann.russo@stonybrook.edu If you have any questions regarding these instructions.
She can arrange to work with you via zoom or phone, if necessary.
Full instructions are beneath this video.
CUTTING THE MASK
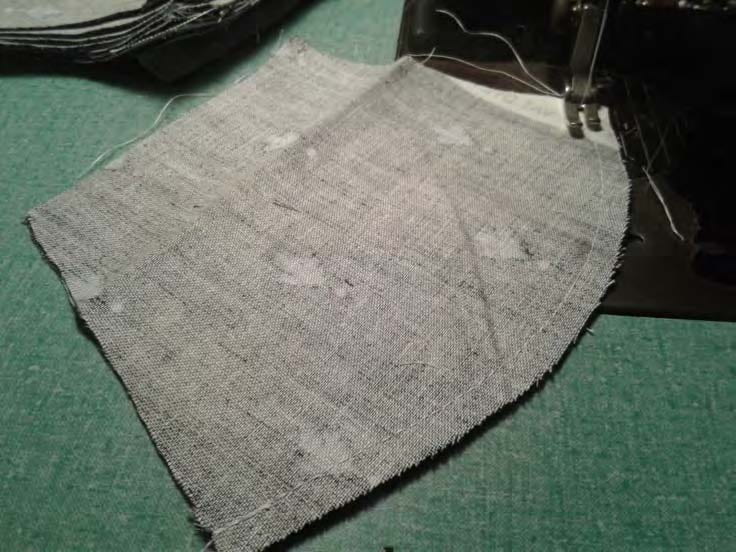
Cut the Front of Mask
1. Place the fabric for the front of the mask with right side in.
2. Place the pattern on the fabric and cut around the black line of pattern.
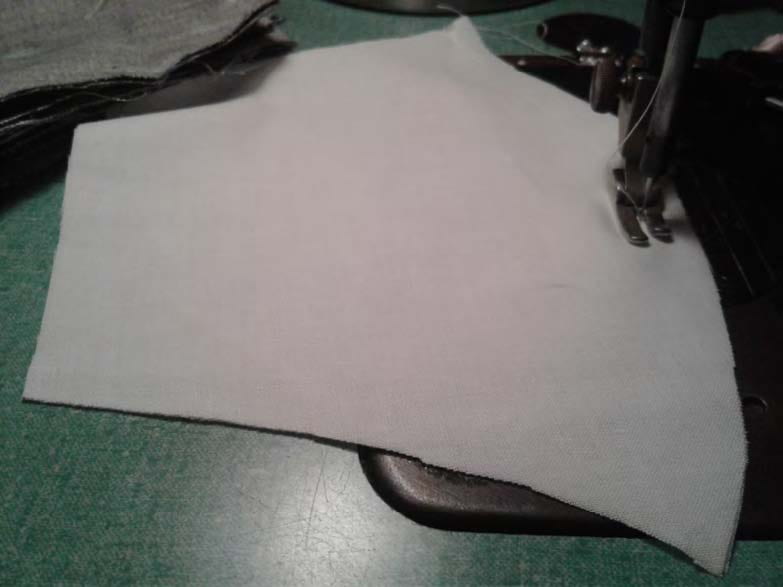
Cut the inside of the Mask
1. Place the fabric for the inside of masks with right side in.
2. Place the pattern on the fabric and cut around the black line of pattern
SEWING THE MASK
1. Sew the two pieces of the front of the mask together at the top (round)
2. Do the same for the lining
3. Open the Front of Mask, open the lining and put one over the other with right sides facing each other and stitch across

4. Cut slits at top to make fall easier when topstitched
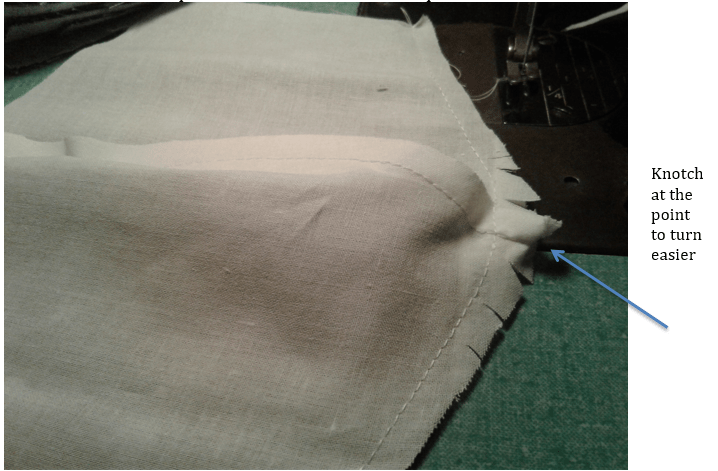
5. Open what you have just sewn together and topstitch across the front and lining of mask to look like the picture below (The topstiching will help it fall easier when you stitch the pockets.)
6. Top Stitch on the lining part of the mask
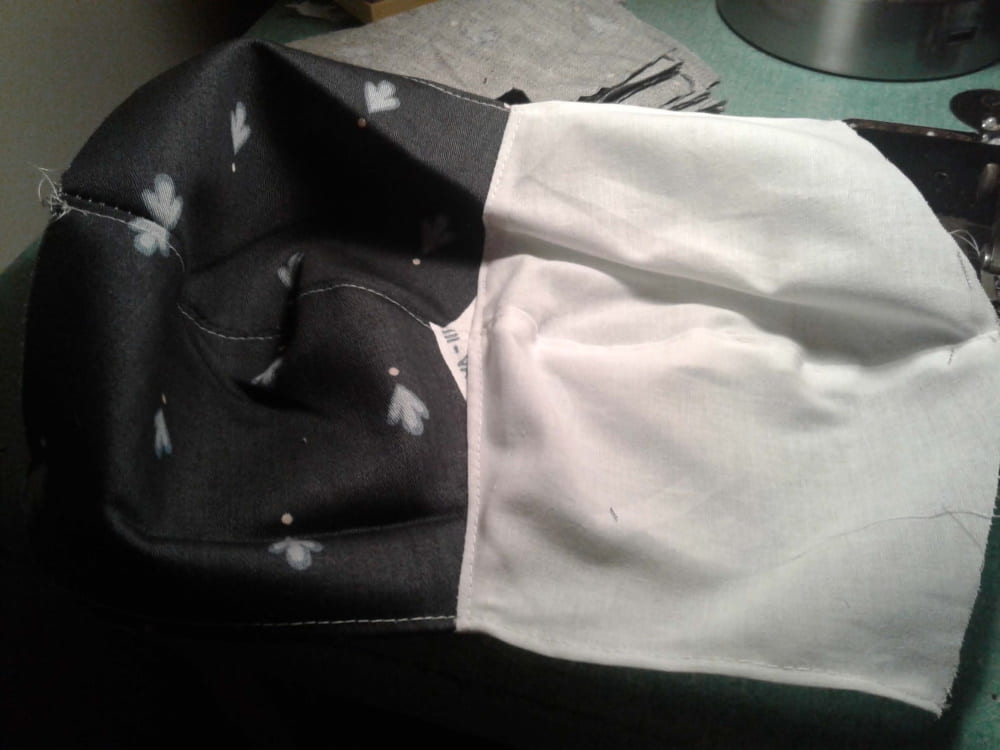
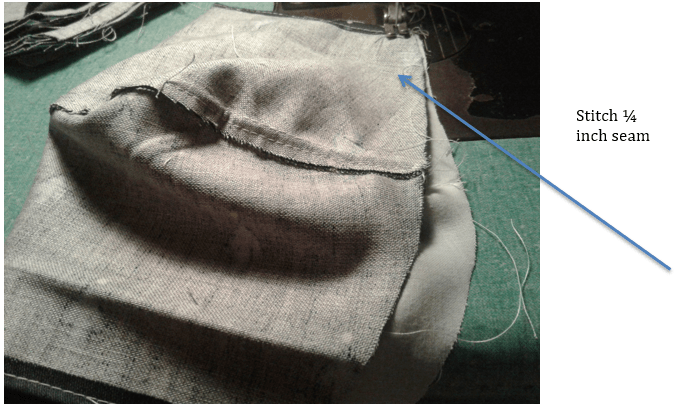
7. Turn the mask upside down with wrong side up and fold the two ends then sew a ¼ inch stitch

8. Place the mask with right side face up and fold to match the two ends and stitch together a ½ inch stitch, see the end of the mask in picture below
9. Turn the mask inside out and with right side up, stitch pockets for elastic on top and bottom to fit elastic through

10. Here is the finished mask.

Now insert elastic in Both Pockets and tie a slip knot. See video below for instructions (Only elastic has to be used. This mask has been approved by a team of Drs and CEO’s. Changes can only be approved by them)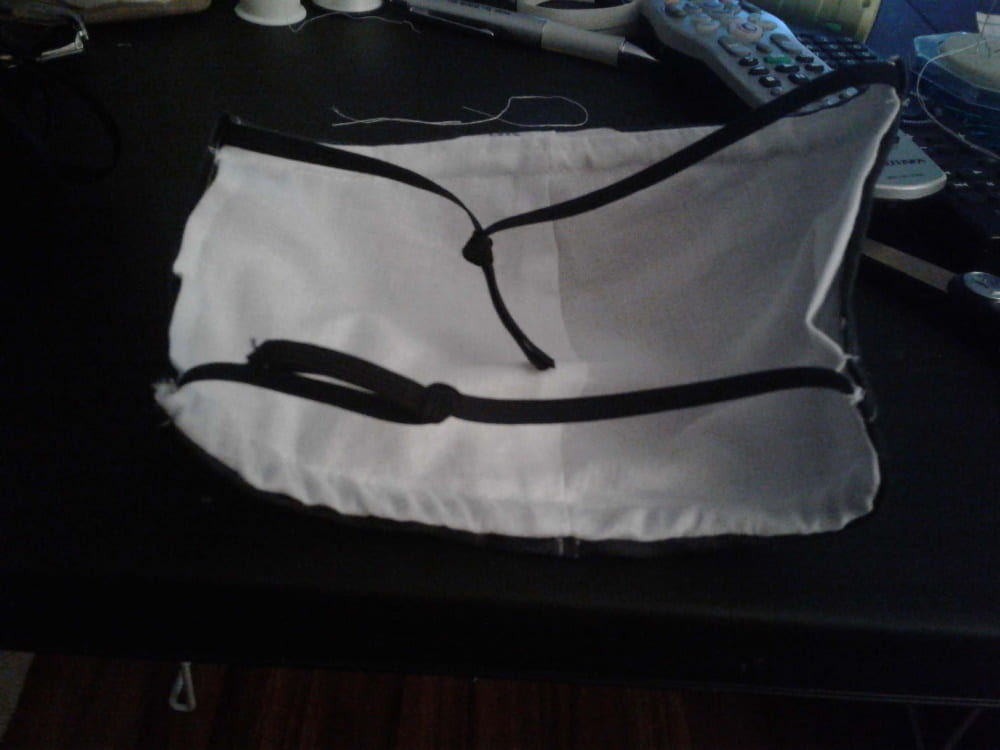
Click on below link to download and open video on how to create a slip tie in elastic
https://you.stonybrook.edu/stonybrookstitchers/files/2020/04/IMG_8027.mov
Video Instructions for tying a slip knot kindly provided by:
Callias Zeng
Pronouns: they/them/theirs
LGBTQ* Services Undergraduate Intern
Sociology; Women’s, Gender, and Sexuality Studies Major
If you need material and/or elastic OR have masks ready to donate, please complete this Google Form.
April 5, 2020 at 5:34 pm
What are the measurements for the fabrics? Are we limited to using only elastic or can we use fabric ties? Thank you.
April 17, 2020 at 8:55 am
Please send me the measurements for the mask. Thank you.
Debbie Sullivan
April 22, 2020 at 3:55 pm
The first page of the website has the instructions and video. Look for the section COVID 19 SBU Approved Hospital Mask Pattern. You will find instructions and a video.
Delivery instructions are in the next section on the website.
May 13, 2020 at 2:36 pm
please send measurements for mask in order to make a pattern.
April 5, 2020 at 10:01 pm
I’m interested to help makes masks
April 5, 2020 at 10:19 pm
Hi, you can sign up to be a volunteer at the bottom of this page: https://you.stonybrook.edu/stonybrookstitchers/mission/contact-us/
April 6, 2020 at 9:03 am
You have been added to the list of volunteers who are making the surgical masks. Thank you for reaching out. We really appreciate it.
Delivery instructions to follow.
Thank you very much,
Jan
April 6, 2020 at 9:51 am
I cannot print the pattern correctly based on the fact that the seam allowance is not 1/2”.
April 6, 2020 at 10:06 pm
The mask I made is exactly like yours except mine has ties, can be made in different sizes and no elastic! Extremely comfortable! Check out FU mask from the Netherlands ! I used cotton twill tape for ties, they can also be made from fabric The fit is great check it out, nurses are already complainingredients about elastic! Let me know ! I have samples
April 7, 2020 at 9:10 am
I have a machine. I live in east setauket. I need supplies and I will make masks. My cell 631-742-1745
April 16, 2020 at 8:58 am
You have been added to the list. Will contact you soon.
April 8, 2020 at 12:05 pm
Was at SBU this morning. Couldn’t find the office for volunteers’ mask making. I need the elastic.
April 8, 2020 at 2:14 pm
Thanks for the awesome video.
The mask pattern I just printed it larger than the previous one.
I don’t know that it’s my printer, but this one conforms to the size
as seen on the inch gridded surface of the video, so many thanks.
April 8, 2020 at 6:18 pm
I want to help. Just send me the materials and I will do it.
Ana Coreas
April 9, 2020 at 5:50 pm
Hi Jan, I’m going to try making some masks tonight. Let me know if you have any elastic to share. Otherwise I’ll try and order online. -Christine
April 16, 2020 at 8:54 am
Hi Christine,
I expect a delivery of elastic today. I’ll get back to you.
Keep sewing 🙂
Much love,
Jan
April 10, 2020 at 9:25 am
Thank you for this pattern. I am a Nurse in NC. We get a surgical mask at work, that has to last for the week. I need to sew one for when I go grocery shopping. I don’t have a sewing machine, but I can hand sew. I have off a few days, so this will be one of my projects.
I am a native New Yorker and a graduate of SUNY Plattsburgh. Appreciate all you are doing.
Sincerely,
Diana Kienle Eubanks
April 16, 2020 at 8:53 am
Thank you for your kind words,
Jan
April 10, 2020 at 12:42 pm
Hello Jan! My name is Leslie DeMarco I have been a SB stitcher for years I deal with Melissa in the hospital. I have lots of required fabric and can sew. I am currently looking for my roll of elastic and will start making masks. I heard about this need from Maryann in the nursing office. I will get to work today!
April 16, 2020 at 8:52 am
Hi Leslie,
Thank you so much for getting in touch with us. We can really use your help. Check the site for delivery instructions. I will update your contact information on our volunteer list.
Jan
April 11, 2020 at 2:25 pm
I have masks for when the delivery instructions are posted but would like to know if you want the children’s surgical caps at this time also. Or would you prefer I hold on to them until after this emergency?
April 16, 2020 at 8:47 am
Hi Judy
We still need the children’s surgical caps. It has taken such tremendous effort to get the surgical caps project up and running that we haven’t mentioned anything else. If you have the wherewithall to make the surgical caps, we would really appreciate it. The children love them. More importantly, these can be professionally cleaned by the hospital.
Thank you so much for all that you do,
Jan
April 16, 2020 at 11:45 am
I have about 30 of the same style masks but with ties instead of elastic. Will they be used or just discarded at the hospital if I donate them?
I am making a bunch with elastic now which I will drop off on Tuesday.
April 17, 2020 at 10:23 am
I can make masks and/or surgical caps. Where do I get a pattern and instructions for the surgical caps?
Joann Fabric store advertises that they are donating supplies to make masks. I will try that later today.
April 22, 2020 at 3:50 pm
The instructions are on the first page of the site. Look for the COVID 19 approved patter for surgical masks. You will find instructions and a video. The next section has delivery instructions.
April 19, 2020 at 3:19 pm
Hi! I currently have about 30 masks completed but I still need elastic. Please let me know if this is possible!! I filled out the google form.
April 19, 2020 at 11:30 pm
Hello. I am a member of your group. My friend is a costume designer. She would like to know if you need surgical gowns. She and her other friends have already made over 100 scrub caps for the Stony Brook hospital in Southampton.
May 15, 2020 at 6:05 pm
Thank you Callais Zeng for the instructions for a slipknot tie; so easy and I can see how it would be so helpful for the wearer . You aced it; I recommend everyone look at it!
April 23, 2021 at 7:20 am
I went through your blog , it is very useful and help a lot . Keep up the great work!!!!
https://dadsprinting.com/
April 26, 2021 at 12:38 am
Very informational blog!! I am very interested in printing and I really liked this. I wanted to give a huge thumbs up for the great information posted on the blog.
https://www.geminair.com.au/
April 26, 2021 at 1:27 am
I loved it! Very complete and easy to understand. Thank you for sharing that.
https://svgembroidery.com/
May 11, 2021 at 9:32 am
This article is really helpful. Thanks for sharing such useful information with us.
https://www.barryisonrealestate.com.au/
October 18, 2021 at 9:01 am
You are very welcome
May 23, 2022 at 5:10 am
Very Informative article , Thanks for sharing.
https://www.fortiusdubai.com/
May 23, 2022 at 1:00 pm
Dear David,
Thanks for visiting our website.
Take great care,
Jan
June 28, 2022 at 8:56 am
I went through your blog it is very informative, nice, and keeps it up.
https://parvatihospital.com/
June 29, 2022 at 8:42 am
Thank you so much.
June 29, 2022 at 6:11 am
Very informational blog and thanks for sharing important news! I am very interested and I really liked this. I wanted to give a huge thumbs up for the great information sharing on the blog.
https://ausbrite.com.au/blog/
June 29, 2022 at 8:41 am
Thank you for taking the time to visit our site. Our volunteers are really special and help the patients, families, and staff so much. It is truly special.
June 29, 2022 at 6:14 am
Thank you Callais Zeng for the instructions for a slipknot tie; so easy and I can see how it would be so helpful for the wearer. You aced it; I recommend everyone look at it! From SI
June 29, 2022 at 6:18 am
Nice blog and very informative. Keep sharing.
Dental veda
June 29, 2022 at 8:39 am
Thank you very much for visiting our site. We appreciate the positive feedback.
June 30, 2022 at 5:51 am
This is such an informative guide about the process of the mask patterns and it would help health workers.
https://batishneurosurgery.co.in/facilities/
June 30, 2022 at 7:33 am
Thank you for visiting our site and recognizing the work that was put into this project. We worked with the infectious disease doctors for this pattern. Several prototypes were made before they approved this pattern.
Take great care,
Jan
July 1, 2022 at 2:37 am
I have seen your content and video about the entire mask process. This would help all the people who are working in this field.
Thanks, very useful article.
https://drhkbali.in/
July 1, 2022 at 12:10 pm
Our volunteers and hospital staff are very talented. Thank you for visiting our website.
July 4, 2022 at 7:45 am
I tried to make such a mask under your guidance. It turned out pretty good, but yours is prettier 🙂 piromax
July 5, 2022 at 9:21 am
Hi Kristya,
Thank you for visiting our site.
As one who struggles to sew a button on, I’m sure your mask is really great. :))
Have a great day,
Jan
July 6, 2022 at 1:59 am
Many thanks for this.
Really wonderful post, keep sharing educational and important stuff with us.
July 6, 2022 at 12:24 pm
Will do. Thank you so much,
Jan
July 8, 2022 at 12:08 pm
I want to express my gratitude to this writer who writes very well and covers all the information on the entire mask process
July 8, 2022 at 12:33 pm
Thank you very much.
July 20, 2022 at 3:04 am
This is a very informative post. Thank you for sharing.
laser-gum-treatment
September 8, 2022 at 12:31 am
I went through the blog, it is impressive.
NFT
September 8, 2022 at 6:54 am
Thank you very much.
September 8, 2022 at 1:08 am
This is very informative, thanks for sharing.
Digital marketing
September 8, 2022 at 6:54 am
Thank you for visiting our website.
September 29, 2022 at 8:17 am
This is very informative, thanks for sharing. skin care
October 11, 2022 at 4:26 am
Great Article. Glad to read this article. Thank you for sharing.
https://vclubcc-shop.tel/
November 3, 2023 at 8:00 am
It was an interesting training for mask production
https://newkhane.ir
November 10, 2023 at 10:56 am
Hi Tina,
We are no longer providing training for making the masks. Our video proves step-by-step instructions that can help you if you want to make a mask.
Thank you for visiting our website.
Jan