You made a room from Zoom Meetings in Blackboard. You know it has a forced password. You know students will be logging into Blackboard to find the link. Isn’t that enough to prevent others from joining? And when I say others, I mean truly foul people who apparently have nothing better to do with their time then really and truly mess up your whole class. Nope. We have to do more
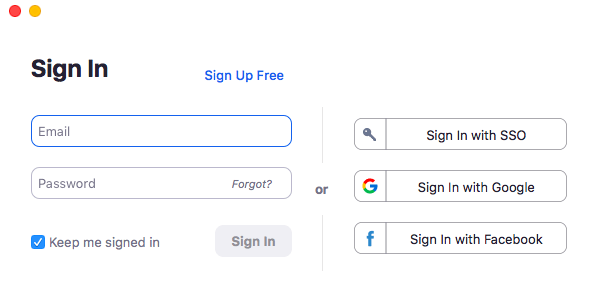
After creating your room in Blackboard, leave Blackboard, and sign back into zoom at stonybrook.zoom.us. Your room will be listed under meetings. Click on the name, go to the bottom on the page and click edit meeting. Just above there, in meeting options, you will find the “only authenticated users can join” option. stonybrook.edu will pre-populate for you. This will force them to use a stonybrook.edu email address and they can no longer be anonymous in the session.
Please note that this means that guest speakers from outside the University will not be able to join. Nor would high school students be able to participate. See other methods for tightening up security below the screenshot.
If you want people from outside stonybrook.edu to join, here are other things that you can do:
Never share the meeting link in Social Media.
from the participant list inside an active meeting:
Lock the Zoom Meeting room once everyone has arrived from the participant list.
Mute Participants on Entry & Don’t allow them to unmute themselves.
Remove unwanted visitors*
Under the share button in an active meeting:
Do not allow participants to share their screen
When you schedule the meeting:
Don’t use recurring meetings. They all have the same URL and password. Obviously this isn’t as convenient. Maybe try this if you continue to have issues and have tried other steps.
Schedule the meetings outside of Blackboard and only give the students the link from a blackboard announcement or email right before it starts. This way the students will not have the URL to share with others beforehand. This means scheduling from stonybrook.zoom.us and not from Blackboard’s Zoom Meetings menu item. You will find that setting for Only Authenticated Users right away if you schedule in this manner.
Don’t Allow Students to Join Before the Host
These settings are found in your stonybrook.zoom.us Settings area.
*Don’t Allow Removed Participants to Rejoin. The default on this setting is for it to be off (which is correct). What it doesn’t tell you though, is the user that you booted from the room can clear there “cookies” and reenter anyway. So it depends on how savy your bomber is.
“Require a password when scheduling new meetings” – this is locked on. So you’re good.
“Require a password for Instant Meetings” – default this is on.
“Require a password for Personal Meeting ID” – default this is off.
In addition, you can disable the setting called “Embed password in meeting link for one-click join”. This means you will have to provide the password in a separate communication from the meeting link. This is much less convenient, but is a deterrent to unwanted visitors.
Consider having a Co-Host to handle these items during the meeting.
and finally:
Shut Down the Meeting
- In an emergency, end the meeting by clicking “End meeting” in the lower right corner of the Zoom window. Then set-up a new meeting with a unique URL, and send it to participants via a Blackboard Announcement and email, etc.
After having said all that…. don’t you wish people were just nicer??
Like this:
Like Loading...