Category Archives: Uncategorized

Brightspace Training Options

SUNY CPD’s Brightspace Training Options

As the Fall 2022 semester approaches many SUNY faculty and staff are preparing to design and/or deliver their digital course materials in the new SUNY Brightspace Digital Learning Environment (DLE).  The SUNY Center for Professional Development (CPD) is pleased to support SUNY faculty and staff by providing a variety of Brightspace training opportunities and asynchronous resources.  These training workshops and resources are available for free to all SUNY campuses and are detailed below.

Training Options:

The CPD offers a variety of training opportunities to provide as much flexibility and choice to our SUNY faculty and staff.  Registration for August sessions is open and new sessions are released based upon registration demand.  If you don’t see the workshop you want at the time you need, please continue to check back, the registration site is updated regularly.

Asynchronous Online Modules

SUNY DLE’s Asynchronous Brightspace modules are a convenient way to progress through the Brightspace training at your own pace.  Progress in the recommended order, or pick and choose which topic(s) are most relevant to your purposes.
There are optional knowledge checks at the end of each topic sections. Participants who successfully complete all assessments will earn a Brightspace Fundamentals Certificate and Badge from the SUNY CPD.
Access to asynchronous modules will be staggered to accommodate the priority needs of Cohorts 1 and 2, as well as the availability of faculty accounts in the new Brightspace environment.  When your campus Brightspace account has been created, your campus will provide your login instructions.

Scaled Webinars

Targeted for larger audiences, these scaled Zoom webinars offer live demonstrations of the Brightspace learning environment and other training topics.  There are opportunities to ask questions of Brightspace experts at each webinar.
These webinars are open to all SUNY faculty and staff, regardless of cohort.

Remote Synchronous Workshops

These live “point & click” workshops are offered via Zoom and will cover the Brightspace Fundamentals training materials. Select a training session based upon your preferred training pace (see Training Levels, below).
These sessions are limited to 10-15 participants per session.
Currently, Remote Synchronous Workshops are available to Cohorts 1 and 2.

Illuminations

These advanced Brightspace workshops are offered in the scaled webinar format and feature Brightspace tools and topics not covered in the Brightspace Fundamentals training.
These workshops will commence September 2022.

Training Levels

We offer multiple training levels to help ensure that faculty and staff receive the style and pace of training that works best for them. Registrants are encouraged to take a brief self-assessment to help identify their training preferences. Upon completion of the self-assessment faculty and staff will be provided a recommended training path. All training opportunities are available, however, regardless of the recommendation.

Recommended paths:

Spark – Synchronous remote workshops at the “Spark” pace, with supplemental Scaled Webinars and Asynchronous Modules, as desired.
Ignite – Synchronous remote workshops at the “Ignite” pace, with supplemental Scaled Webinars and Asynchronous Modules, as desired.
Blaze – Scaled Webinars, supplemented with Asynchronous Modules, as desired.
Bonfire – Asynchronous Modules, supplement with Scaled Webinars, as desired.

Recordings

Recordings of all training options are available to SUNY faculty and staff on the SUNY DLE website behind authentication. Log in using your SUNY Federated ID (your campus username and password through single sign on) and you will be granted access to the recordings.
As new workshop topics are introduced, new videos will be released.

Resource Guides

Faculty resource guides will be available by August 4, 2022 on the DLE website.
These guides will provide written instructions for all topics covered in the Brightspace Fundamentals workshops.
In addition to written instructions, the resource guide page contain links to videos that demonstrate specific tools and actions within the Brightspace environment.

Registration

We look forward to seeing our SUNY faculty and staff in our upcoming SUNY DLE Brightspace programming. For questions regarding programming, please reach out to Jamie Heron, SUNY Online Program Manager, SUNY CPD (jamie.heron@suny.edu).  For technical questions regarding the registration process, please reach out to Viktorya Mirzoyan, Program Coordinator, SUNY CPD (viktorya.mirzoyan@suny.edu).


Jamie Heron
SUNY Online Program Manager
SUNY Center for Professional Development

Brightspace: e-mail the whole class

So, in my last post, I showed how users can opt in and out of notifications.  In this post we get around students being able to opt out of announcement notifications and also help keep your course site a little cleaner.

As opposed to sending an Announcement, you can email the whole class by going to “Course Admin” in the NavBar -> Learner Management section and click on “Classlist”.

Then select from the top “Email Classlist”

Click on “Send Email”

and compose your email to the whole class here.  Click “Send”.


Brightspace Notifications

How to setup your alerts  and register your mobile device on Brightspace:

Find Notifications under the location where it says your name.

—————————————————————————————-


Under Contact Methods:

Register your Mobile Device

—————————————————————————————-

—————————————————————————————-

—————————————————————————————-

Set your SMS and eMail notifications:

—————————————————————————————-

—————————————————————————————-

When you have everything setup, click Save at the bottom left corner of the page.

Remember to check your email inside of Brightspace.  You can see that by clicking on the icon that looks like an envelope.

Name Change – Sorta

Turning Technologies, our polling/clicker system was purchased by Echo360, our capture system.

What we referred to as Turning Point or Turning Point Anywhere, has been rebranded PointSolutions.

In Brightspace in order to link the course to polling, the instructor will need to make a link available for the students  to be able to register their devices and/or licenses.  To create this link you will go to the Content Menu item, then click on “Existing Activities” -> “External Learning Tools” and select Turning Account Registration.

You may see some overlap between it being called Turning Something-or-other and Pointsolutions for some time, so I wanted you to be aware.


Need to Move a Course from Blackboard to Brightspace?

If your course was not one of the courses that was automagically moved from Blackboard to Brightspace, you may be wondering how to move it yourself.

The first thing you should look for is whether ANY version of the course you want to export has already been brought to Brightspace.  You may have more than one.  For example you might have a Fall 2021 copy and an empty shell for Fall 2022.  If what you want is in the Fall 2021 copy, you don’t need to export anything from Blackboard – it is already there.

If absolutely no version of the course you want to bring over exists in Brightspace (perhaps something you haven’t taught in a while AND you aren’t teaching it in the fall either), pause following these directions to make a ticket for a “Bb course copy shell in Brightspace” where you will include the Course Designator & Number (example: BIO 203). After you have some place to put your export, continue with these steps. If you only have the 2022 shell in Brightspace and you don’t want to move your old course directly into 2022 (very wise move!), also complete that same ticket.

The second thing that I want you to know is that Brightspace cannot import courses that are greater in size than 2 gigs.  You may not know what the size of your Blackboard course is until you export it, so perhaps don’t worry about this right away, but if after exporting the course it turns out to be too big, just remember what I started with here.  If it is too big, this will probably be due to large presentations or documents that you loaded directly into your blackboard course.  You will need to remove these items and host them elsewhere.

For example:

  • Videos can be moved to echo360 or youtube
  • Documents can be moved to google drive
  • etextbooks can be moved to google drive or check to see if they are available via the library

Exporting a course doesn’t work exactly like it used to work in Blackboard, so if you have done it in the past, read this anyway.

NOTE: For a far less verbose version of this post, please see this link.

Go to your course that you want to bring into Brightspace.  Go to Packages and Utilities under Course Management in the left menu.  Under Packages and Utilities, select Export/Archive Course.

Select Export Package.

Under Select Course Materials, “select all”. 

THEN UNSELECT SETTINGS — this is the new part that changed

Click Submit and wait.

Success: This action has been queued. An email will be sent when the process is complete.

When the export is finished it will show up on this page if you hit refresh.

You might, like me, think “download” would be in this pull down menu:

It isn’t though.  Just click on the name of your export to download it to your computer.

Now go to Brightspace.

Enter the course you want to import the content into.

TIP:  You can use your Fall 2021 course to bring in other semesters content too.  That way you have one place for all versions of a particular course you have taught.  Like a box of all things BIO 203 – regardless of what semester it came from. 

Go to Course Admin

Find the Catagory “Site Resources”

Click on Import/Export/Copy Components

Select Import Components (at the bottom of the page) and click start.

Click upload and select the zip export file you downloaded from Blackboard.  If this is a big file, it will take a little time to upload and you won’t be able to select Import All Components until it has finished. If your export file was bigger than 2 gigs, see the “second thing” to know at the top of this blog post.


Assuming for a moment that you imported the content into a location that is not the “live” course you will be teaching from, go to the course that you will be teaching from and go back to the Course Admin -> Site Resources -> Import/Export/Copy Components area again, and this time select “Copy Components from another Org Unit”.

You will be able to search for the location you copied the course to, and select just the items you want to bring to the “live” course shell.  This way you aren’t pulling years worth of unneeded items into the live course, just the pieces that you know you want.

TIP: Keep your non-live course storage organized by semester and year if you have the desire to bring many semesters worth of the same course over. Try to help your future self find what you would be looking for.

Don’t forget to do some housekeeping on any content you bring over to the “live” course.  Check for correct dates, availability, exceptions, links, formatting, accessibility, etc.


Reusing Echo360 content

There are two different ways of sharing echo360 content in Blackboard, and therefore two different ways to reuse the content as well.

Most instructors at SBU currently link to their echo360 videos via LTI links.  This has been the only way in the past to get the analytics that you needed, give the students the active learning tools and also automatically post new scheduled recordings as they happen throughout the semester.  Using the LTI link is the process where you are going to a content area where you want the videos to be placed, selecting “Build Content -> Echo Cloud”.

When reusing the LTI link in a course you have copied from a previous semester, you will want to go to where the link was made (it will still be there), click on that link and reconnect it.


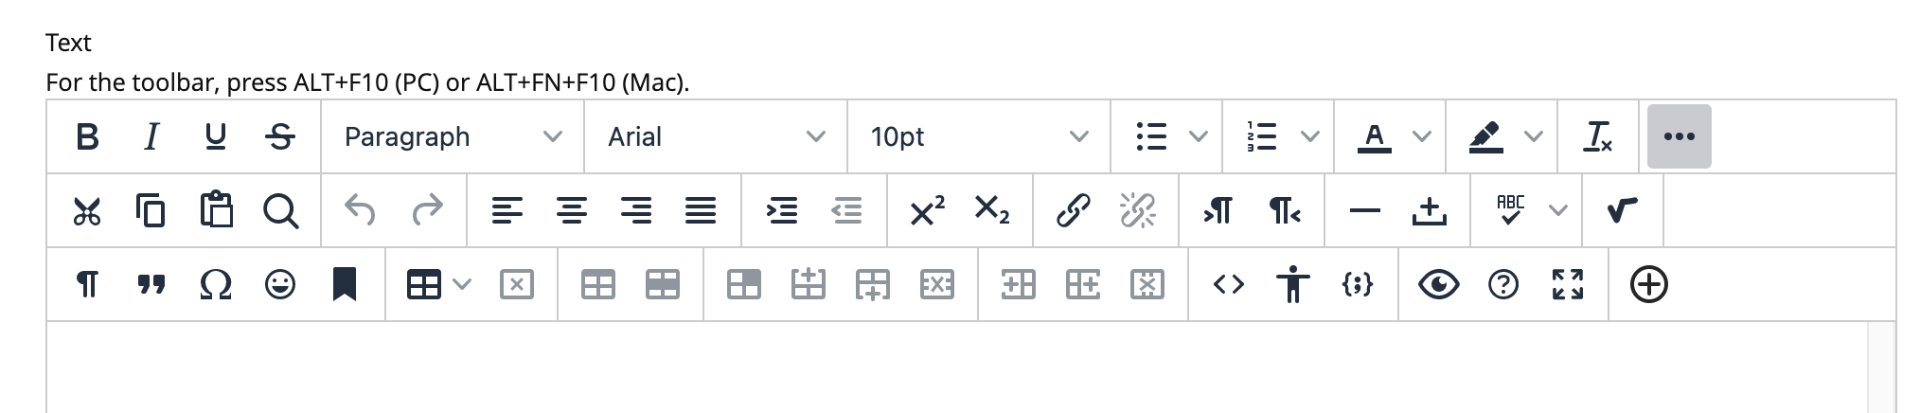
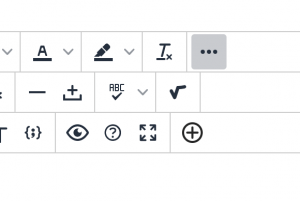
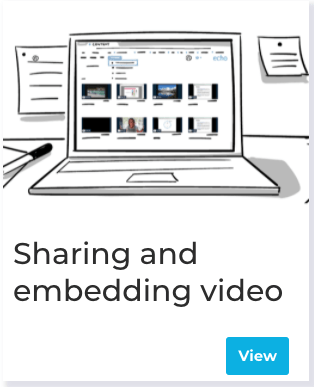
The second way and previously feature sparse method (but this has been rapidly changing!), is to embed the echo360 content into any area of your site that gives you the ability to use the Bb text editor.  You can embed content using the wysiwyg editor using the button : “Add Content -> Echo360 Video Library”. It looks like a plus sign in a circle and is the last button on the bottom right.

When you have embedded content and you run a course copy, the video will still work without further tweaking.  It is for this reason, and because echo360 has been working hard to bring all the features to the embed model that already exist in the LTI links, that we will be suggesting using embed going forward (at least, as soon as playlists are up and running and that could even happen this week).


Organize and Share content changes upcoming in echo360

We are writing to inform you of upcoming changes to how you can organize and share content in Echo360. These changes will improve the ability to share content with others, organize shared and personal content, and find content in your Library.


Echo360 Community,

We are writing to inform you of upcoming changes to how you can organize and share content in Echo360. These changes will improve the ability to share content with others, organize shared and personal content, and find content in your Library.

What is changing?

The upcoming changes involve three key components, which are explained below:

  • The Groups feature will be renamed Collections
  • Collections will be added to the Library
  • The existing class collection feature on the section homepage will be renamed to “Class Group” to avoid confusion

All current Groups capabilities will be available in Collections and new capabilities will be rolled out in future releases, making Collections a more powerful way of sharing and organizing content than is currently available.

In the current user interface, Groups is a separate tab, accessed in the top navigation as shown below.

Collections_Picture1

When Groups is renamed to Collections, users will see their Collections on the Library tab as well as on a separate Collections tab, as seen below.

Pic2_customercomm

Also, the feature that allows the instructor to create collections of classes inside an Echo360 Section will be renamed Class Groups as shown in the image below. This will reduce confusion with the new Collections feature, as shown in the image below.

Picture1----2


Why is this feature changing?

By renaming Groups to Collections, it will be clearer that this feature offers a way to organize content as well as to share it with others. Collections can be used by individuals to organize content in their libraries without the need to share it. When a Collection is shared, the new structure will make it easier for users to find content that has been shared with them without the need to navigate to a separate tab.

We will be building out the capabilities and permissions for content shared in Collections going forward and this name will make more sense for the new capabilities that are planned.


How does this affect users?

This change doesn’t remove any existing capabilities and should make new capabilities easier to implement into content management workflows. Other than adapting to a new name, the primary impact of this change is that users will no longer need to navigate to a separate tab to find shared or organized content.


When will this change happen?

At this time, we anticipate this change to be implemented in our first deployment of 2022, on 11-12 January 2022.

What do you need to do?

This change will be pushed automatically and there will be on-screen orientation to explain the changes. To better prepare your users, you may want to provide them with advanced notification. Please feel free to share this email and/or the screen shots in your communications.

If you have any questions or concerns, please contact your Echo360 representative.

All the best,
Echo360 Team


Getting Started with Echo360


These pages are here to provide Instructors a walk-through of the more commonly used features of Echo360. The pages contain click-through infographics, videos, links to our online documentation, and Quick Reference Card links, available for viewing and download as PDFs.

Start with the Overview. Learn about the typical uses of the platform, navigation in and around Echo360, and get insight from other instructors on creating media and engaging students.


Overview of echo360Creating and uploading mediaSharing and embedding video Overview of Echo360 analyticsEditing MediaIntegration with MS Teams and Zoom


 The menu image in the top-left corner of every page opens a Table of Contents for everything here. Easily browse for the pages you want to view or re-visit. Hover over each item in the list to see the full title of the page. Go ahead, click it now! The Search functionality is on the top-right corner of every page. The Main menu icon is in the footer of every page.