Category Archives: Uncategorized

From echo360…

We are excited to announce that our support, documentation, and training resource site is now live with a single unified experience in our new Echo360 Resource Center!

The Resource Center was built with our institutions and our users in mind – whether you are an instructor, student or administrator, we’ve got a new and improved experience for you.

Highlights:

  • Improved Portal Login for Administrators
  • Easier-to-Find Content
  • Critical System Status

Check out this quick demo that showcases the exciting highlights.

Screen Shot 2017-11-16 at 12.36.22 PM.png

What this means for you?

We are going to keep the legacy site (help.echo360.org) and the Resource Center running in parallel until the end of January.  Many of our partner institutions have linked content from help.echo360.org to internal help desk or vendor support sites within their institution.  Those links will need to be updated and relinked to the Resource Center.

We look forward to delivering you and your Echo360 user community a better experience.

Sincerely,

Echo360 Academic Partnerships Team

Adobe Connect addin giving you grief?

You can try downloading the newest version

or
to force the session to open in the browser instead of the addin:
add
 ?launcher=false
to the end of the URL
example:
https://meeting.sinc.stonybrook.edu/sinc?launcher=false

Looking to buy a clicker or clicker license?

You have two official paths to choose from.

The campus store where clickers and licenses are now available at Shop Red West in the Melville library, Shop Red East in Level 2, Room 310 of Health Sciences and Seawolves MarketPlace at the Student Activities Center (SAC). Which has these prices:

Clicker w/ 1-year subscription –> $76.00
Clicker w/ 5-year subscription –> $108.00
1-Year Subscription ONLY –> $39.98
5-Year Subscription ONLY –> $74.98

The nice thing about this option is that you walk out with a clicker or license and don’t have to worry about waiting for it to arrive in the mail.

Or you can get them directly from Turning Technologies.  You can get to the SBU Turning Technologies store by going into your account (inside Blackboard, in your course , then  Tools -> Turning Account Registration and then click through till you see something that says purchase subscription or purchase clicker. These are the current prices:

Clicker w/ 1-year subscription –> $53.98
Clicker w/ 5-year subscription –> $77.98
1-term Subscription ONLY–> $17.99
1-Year Subscription ONLY –> $24.99
5-Year Subscription ONLY –> $48.99
Clicker ONLY –> $32.99
If you get a clicker, you have a minimum shipping (from my test) of $7.80 and licenses get directly applied to your account (so no risk of typos) and incur no shipping charges.


Single Sign On is now Enabled for Turning Technologies

Now you don’t have to remember a separate sign on anymore!  Yay!!!

The email you use for your username must be your stonybrook.edu email.

The login page can be reached here: account.turningtechnologies.com/account/   or from your blackboard course site, under Tools -> Turning Account Registration (clickers)


Organizing your course files in echo360

echo360 has added so many features to its cloud based platform, that it starts to resemble a light learning management system (LMS).  Today, I want to show you how to organize your files inside of echo360.

The original usage for echo360 at SBU was for classroom based capture.  Essentially we would schedule room recordings that would grab the video from a camera in the room, the video as was projected on the screen by the instructor in the room, and the audio from the room.  This would typically produce a list of videos, that grew as the semester went on.  Not a lot to organize there.

Now however, every user gets a library in the cloud.  This is where your learning documents will go, in addition to any room based captures you may have.  It takes the following files:

Mainly, videos, pdfs, audio, and power points.

To get content there, select UPLOAD CONTENT

It allows you to grab these files from a few different locations… or just drag and drop them.

If you have selected a file it likes, it will process the file and eventually it will be listed and happy in your Library.

Assuming you now want to have them show up for your students, keep following along here.

Next you will click on the file in your Library and you will see the file in the top part of the window and three sections in the lower part, labeled INFO, PUBLISHING and SHARING.

Click on PUBLISHING and then the blue button “PUBLISH”

Select To a course – Use the pull down menu to pick a course and the second pull down to select the section

and when you select New Class  the ability to name the file comes up as seen below

BREAK — terminology alert!  in echo360 speak, a “class” is sorta the same as a lesson – or in this case, stand alone document.  The existing class option, will bind the file to an existing recording for a particular day.  Likewise, “Class name” should just be a descriptive name of the file.

ok.  Now that the file has been published to the correct course, we can organize this further for your students (and possibly your own personal sanity.)

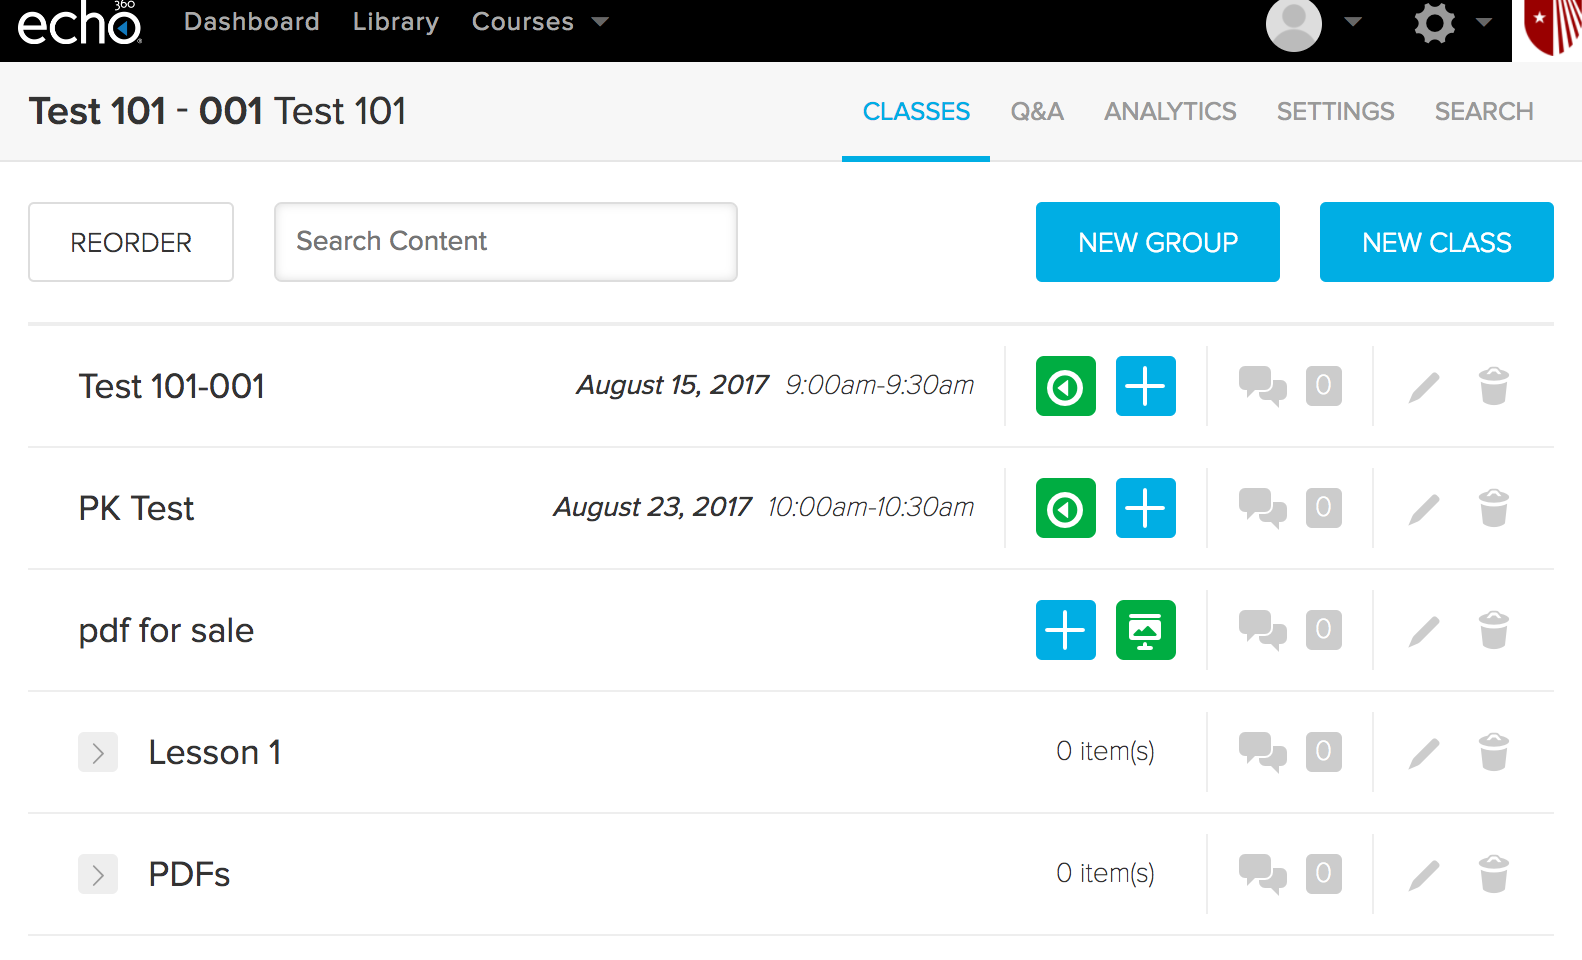
Here is what my list of files looks like in the test course.  It’s fine, there aren’t a lot of them, so it isn’t very messy.

Oh – wait, here is another terminology alert! NEW GROUP… equals “New Folder”.   It comes with a functionality alert… if you delete a folder filled with stuff…. the stuff just gets unsorted and shows up in the main list again.

So I will pretend I want to make a Lesson 1 folder and a PDFs folder.  I click on NEW GROUP

name the file… write a description if I want, and click OK. I’m doing this twice for the two new folders. Now my list includes those two new folders.

To put my files into those folders, I first click on REORDER

That puts blue dashed lines around all the items and they can be dragged around.

I’ve dragged them into the folders and now I have to click SAVE

This slightly terrifying warning pops up


Click OK

and now everything is neat and organized.

And the Award for Most Frequently Asked Question on the 2-2777 Line Goes too….

“I need to add “So N. So” to my class as a TA (or some other role).  How can I do this?”

Really, I would have thought it would be something more difficult; but it turns out that this is common enough and just barely tricky enough, that it merits lots of support calls.

Let’s walk through it.

  1. Login to Blackboard and enter the course that you want to add the user to.
  2. Go to “Users and Groups

3. Expand “Users and Groups

4. Click on “Users
5. Hover over Enroll User and click on “Find Users to Enroll

6. Click on Browse

This opens this window:

7. I’m going to guess you might not know their username, but you probably know their email (which is also unique – remember, names are not unique). SO….  Use the pull down menu right after the word Search to set to email, leave contains, and click go after typing the first part of their email address into the search field. (exp. jennifer.adams)

8. Check the box next to their name and click “Submit

9. Pick the role that you want them to have in the course… in this case I’ve picked Teaching Assistant, and click Submit.

And that is it!  I’m going to remove Dr. Stanley from this course now.


Amazon Prime Day?

Welcome Prime Citizen!

If you are like me and looking to take advantage of some Prime Day shopping… here are two tidbits.

This website: https://camelcamelcamel.com/  can check to see if something is really being sold at the best price.

Also… if you have an Alexa voice device… you get start shopping today — well now!  7pm!  I just got a wand.  Trying this out.


How echo360’s role structure when linked to blackboard cripples its functionality

Say you are an instructor.  You want to use Blackboard and echo360 active learning or capture platform.  You have TA’s or Course Builders in Blackboard.

So, you set up a schedule of captures through your support people for your course.  You do want to publish these captures to Blackboard, so you also create this link (or maybe the support people do it for you.)  Now you and your students can click on the link in Blackboard ( for us it is a video link in the Content Area of Blackboard course…) and see all the captures. The instructor also sees a dashboard of interesting analytics and has increased possible functionality.

But here is the crappy part: TA’s and Course Builders get Instructor roles in echo360.org.

So – that neat feature where Instructors would actually have a button in their account that allows them to add an ad hoc capture on their own?  That has to be turned off.  When you use this feature one can book a recording in any room that has an echo appliance… not just the one that you class actually occurs in. Can’t have students just recording content from any place they want.  Sometimes grand rounds even happen in these rooms.. whoops HIPAA violation!

I like to allow Instructors to delete their own content.  Nope.  Turn that off.

Let instructors make copies of their content?  Nope.

Well… maybe the primary instructor for a course could just go in a demote students that have instructor roles in echo360 back to students?  Nope, instructors can only add more instructors. (I actually tried this as an admin… and yes, I can demote an instructor – theoretically to student.  Only when you actually do this, it doesn’t make them a student at all… it removes them entirely.  Don’t worry though, as soon as that TA goes back into Blackboard again and clicks through to echo360, they will be back in the course again — AS AN INSTRUCTOR.)