Tag Archives: large class

Brightspace: Advanced Assessments

Previously Titled: New Feature in Brightspace: Graders and Grade Release Permissions


Step by Step Advance Assessments

Create an assignment in Brightspace

Go to the Evaluations & Feedback side panel and expand it to see the options.

visual of side panels associated with assignements

expanded evaluation & feedback vidual

These options, depending on what you pick, reveal additional options.

Click on Select Evaluators (you can choose from the people enrolled in your course with a grading permissions role.)

picture of the select evaluators area of brightspace

Choose how evaluations will process with multiple evaluators.  You can choose between:

  • All evaluators work on the same evaluation together. Publishers release this evaluation to learners.
  • Evaluators work on their own evaluations separately. Publishers aggregate results into one final evaluation and release it to learners.

screenshot of the stated evaluation options

IF you have multiple evaluators: Allocate Evaluators to Learners (select which graders will grade which students)


the pull down menu lets you choose from

  • Allocate all evaluators to every learner
  • Randomly allocate 1 evaluator to every learner evenly

screenshot of the allocation methods

You can manually finese these generic selections by using the Evaluator Allocations options area and checking or unchecking students for a given evaluator.

If you have new students come in to the course, Brightspace will follow the automatic allocation method you picked for the new learner enrollments.

Choose publishers:

screenshot of the select publishers area


Important: It’s best to configure these settings when creating your assignment. If that’s not possible, make any necessary adjustments before receiving submissions. Once a student has been graded, these settings become locked and cannot be changed. Additionally, if submissions exist but no students have been graded, removing all evaluators will permanently disable advanced assessment features. This means grading will revert to the standard assignment process as it existed before these features were introduced to Brightspace.


notebooklm icon to indicate chat featureChat with my Advanced Assessments NotebookLM about this subject if you have any questions. You must use your SBU gmail to use this feature. (I am learning how to do this and may need to add each person who wants to use this chat. Feel free to reach out with a request if that turns out to be the case.)


Deep Dive by NotebookLM: Listen to the Audio here.


Auto Grade Large Class Submissions

For this tutorial we will look at how to auto grade a very large class, after they have completed a blackboard assignment submission.

This is the scenario I am envisioning, and hopefully it will give you some ideas of how you could use this for your large class.  A large lecture Chemistry class has just received a problem to solve on paper.  Perhaps they have to show covalent bonds or something of that nature, but the real important thing is that they are producing a hand made image (could be from there touch device too) and they are going to send a screenshot or photo of their sketch to the instructor via blackboard. The instructor, wants to grade them for their participation in this activity.

So first step is to create the assignment. 

Login to Blackboard with your NetID and password. Go into your course and then to your content area where you have your assignments listed.  Create the assignment:

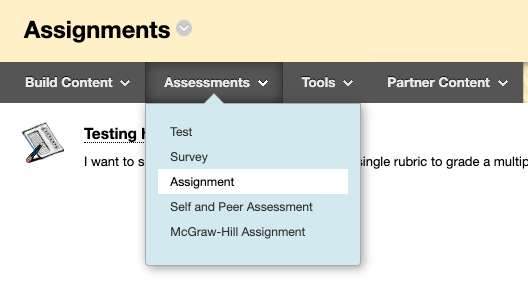
Use the Assessments pull down menu and select Assignment.

Give it a name and clearly tell the student what you want them to do – including that you want them to submit back to you this file with the drawing.

The student clicks on the assignment, and clicks Browse My Computer to upload the drawing.

They see this Review Submission History:

If the student clicks on the SUBMISSION link, they can view their masterpiece:

Now.. you have gotten your hundreds of sketches back through the assignment and it is time to grade them.

Go to the Grade Center and click on the Full Grade Center. Now click Work Offline -> Download.

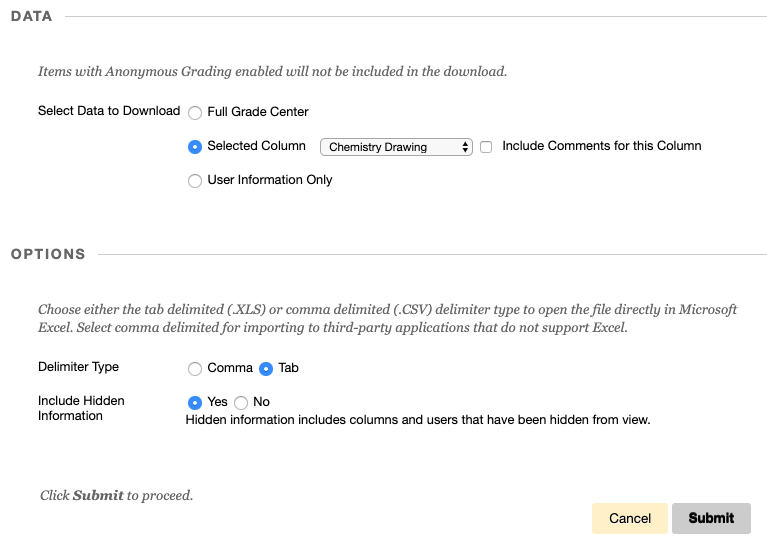
DATA
Set the download to Selected Column

OPTIONS
Set  Delimiter Type to Tab for OSX  and to Comma for Windows
Set Include Hidden Information to Yes

Click Submit

Click Download

Open with your favorite spreadsheet program.  Every student who submitted a file in response to your assignment will have the words “Needs Grading” in the spreadsheet. Those that did not submit the assignment will be blank.  Find and replace “Needs Grading” throughout the spreadsheet with the point value of the assignment.  In this case my point value will be 5. 

Now we save the file – keeping either tab or comma delimited as indicated when you downloaded the file.  Go back to Blackboard and back to the Work Offline menu, selecting Upload

Browse My Computer for the file. (I have a Mac, so mine is a .tsv file)

Click Submit

Now in your grade center, every student that had Needs Grading, now has a 5.