For this tutorial we will look at how to auto grade a very large class, after they have completed a blackboard assignment submission.
This is the scenario I am envisioning, and hopefully it will give you some ideas of how you could use this for your large class. A large lecture Chemistry class has just received a problem to solve on paper. Perhaps they have to show covalent bonds or something of that nature, but the real important thing is that they are producing a hand made image (could be from there touch device too) and they are going to send a screenshot or photo of their sketch to the instructor via blackboard. The instructor, wants to grade them for their participation in this activity.
So first step is to create the assignment.
Login to Blackboard with your NetID and password. Go into your course and then to your content area where you have your assignments listed. Create the assignment:

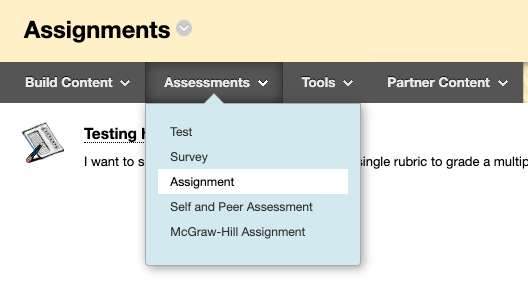
Use the Assessments pull down menu and select Assignment.

Give it a name and clearly tell the student what you want them to do – including that you want them to submit back to you this file with the drawing.

The student clicks on the assignment, and clicks Browse My Computer to upload the drawing.
They see this Review Submission History:

If the student clicks on the SUBMISSION link, they can view their masterpiece:

Now.. you have gotten your hundreds of sketches back through the assignment and it is time to grade them.
Go to the Grade Center and click on the Full Grade Center. Now click Work Offline -> Download.
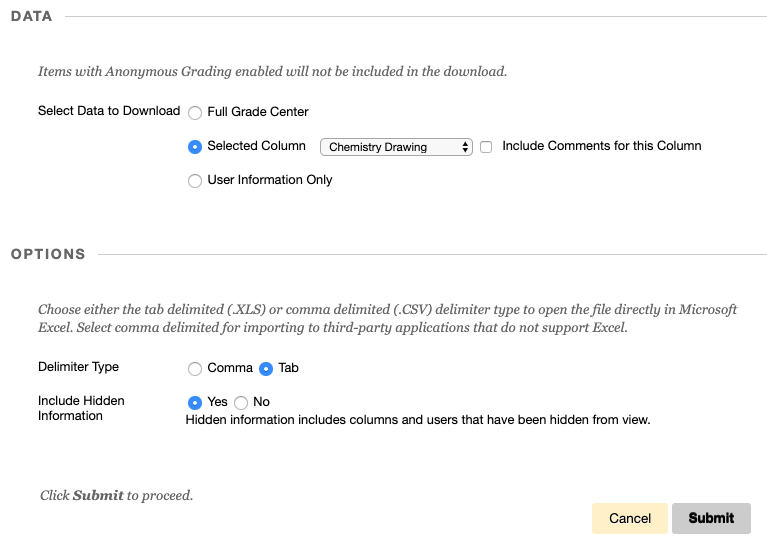
DATA
Set the download to Selected Column
OPTIONS
Set Delimiter Type to Tab for OSX and to Comma for Windows
Set Include Hidden Information to Yes
Click Submit

Click Download

Open with your favorite spreadsheet program. Every student who submitted a file in response to your assignment will have the words “Needs Grading” in the spreadsheet. Those that did not submit the assignment will be blank. Find and replace “Needs Grading” throughout the spreadsheet with the point value of the assignment. In this case my point value will be 5.
Now we save the file – keeping either tab or comma delimited as indicated when you downloaded the file. Go back to Blackboard and back to the Work Offline menu, selecting Upload


Browse My Computer for the file. (I have a Mac, so mine is a .tsv file)
Click Submit
Now in your grade center, every student that had Needs Grading, now has a 5.
Like this:
Like Loading...


