Beta live captioning directly in Chrome

Link to video – click here

Though we recommend running Zoom in the Zoom app… this may work for live captioning if you Zoom from Chrome instead.  Try it out and let me know!


A Comparison of Automatic Captioning in Various Streaming/Recordings Solutions we Presently Have at SBU

The first demo is inside of Google Meet.  While we are a Google Apps campus, the fact that we can record right now freely inside of Google Meet is actually a feature that Google turned on during COVID-19, and not something that normally is included.

Google Meet does have a live captioning feature (run by computers) that comes with Meet.  However, as you can see in the screen shot below and compared to the recording, not only does it not give you any documentation of that live captioning afterwards, in the form of a transcript or regular closed captioning, it even disappears from the recording as well.  (How rude!)

screen shot of live Google Meet session

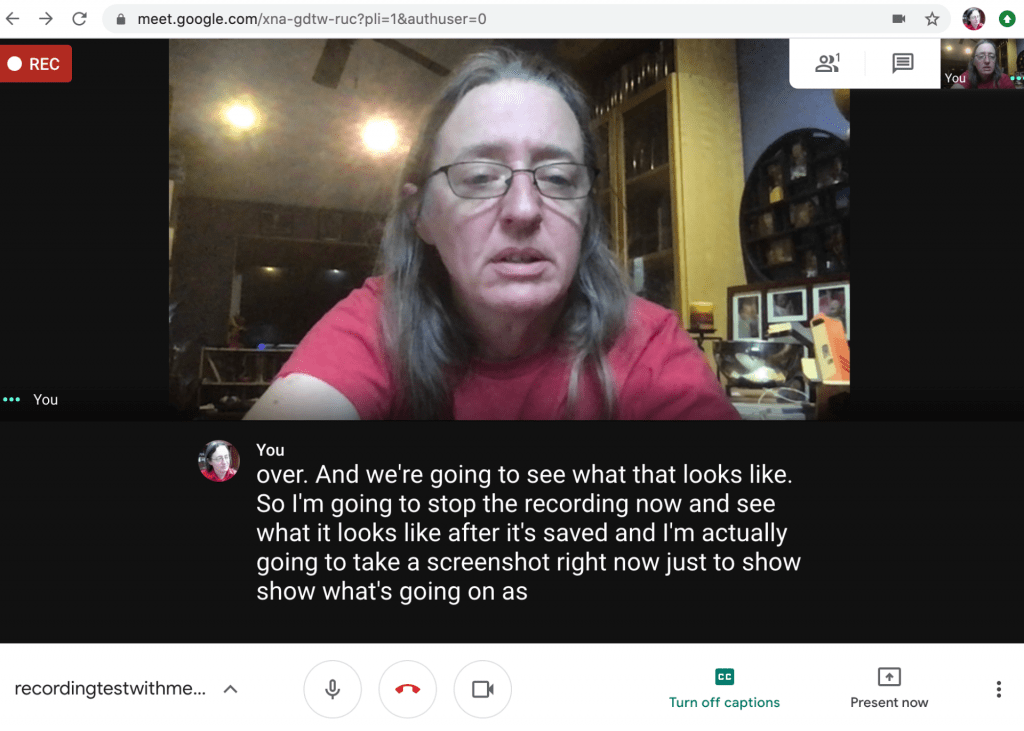
Recording from Google Meet

screen shot from recording of same meeting:

screen shot of google meet recording

Now in Zoom.

Screen Shot:

screen shot from live re

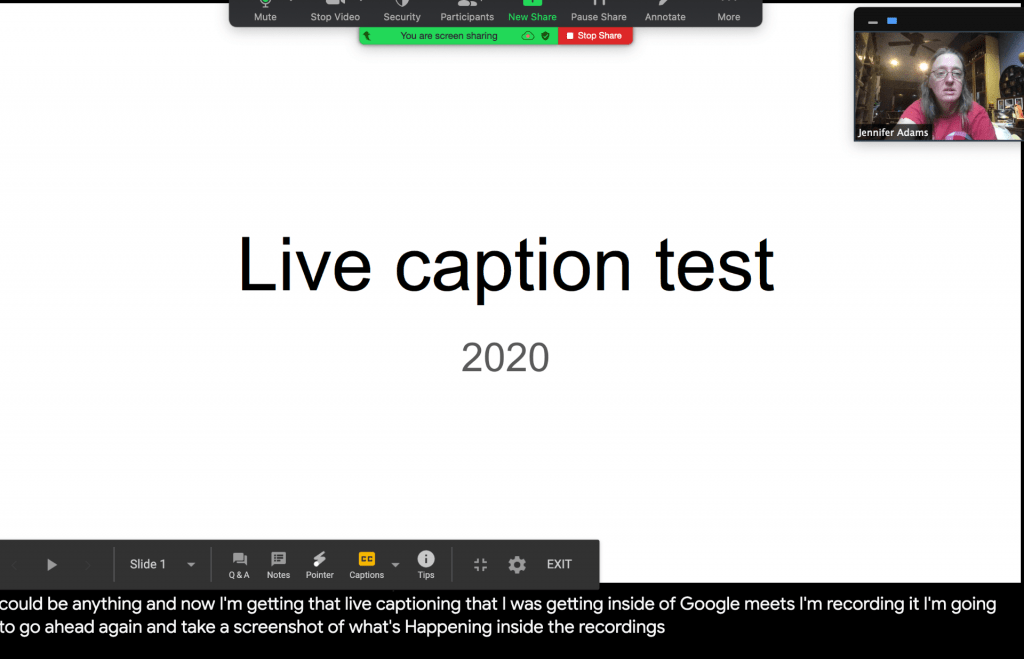
To get the live captions, I shared my screen with Google Slides and turned on live captioning.  This also does not produce a transcript at the end, BUT the live captions are captured in the recording, unlike Google Meet.  On the other hand, because I recorded to the Cloud in Zoom, an entirely new ASR caption file is created after the recording is done being processed.

Here is a screen shot showing both the live captions and the new post process created captions at once:

live captions and post processed captions shown together in screen shot

Here is the actual Zoom recording**:

https://stonybrook.zoom.us/rec/share/84usuh4yyp2J_qor9mlnr6lpenOhsYZFfpRzq1JqmvHwa4YEXzR7QO196J0VAZzY.nFjtJGL8UW_ohU2W Passcode: 8?Lq4Jrj

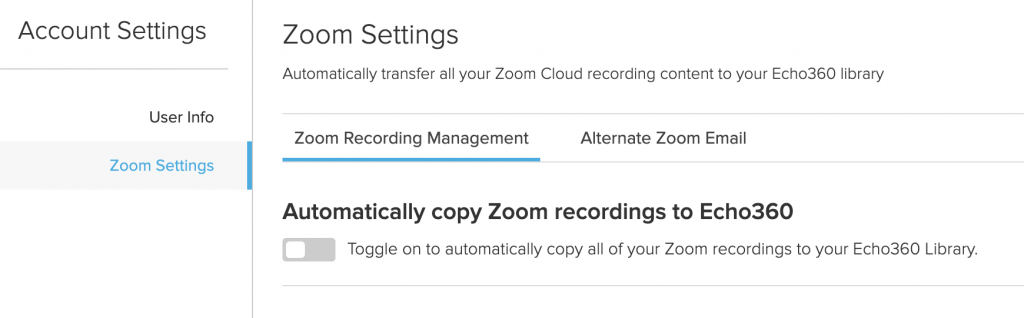
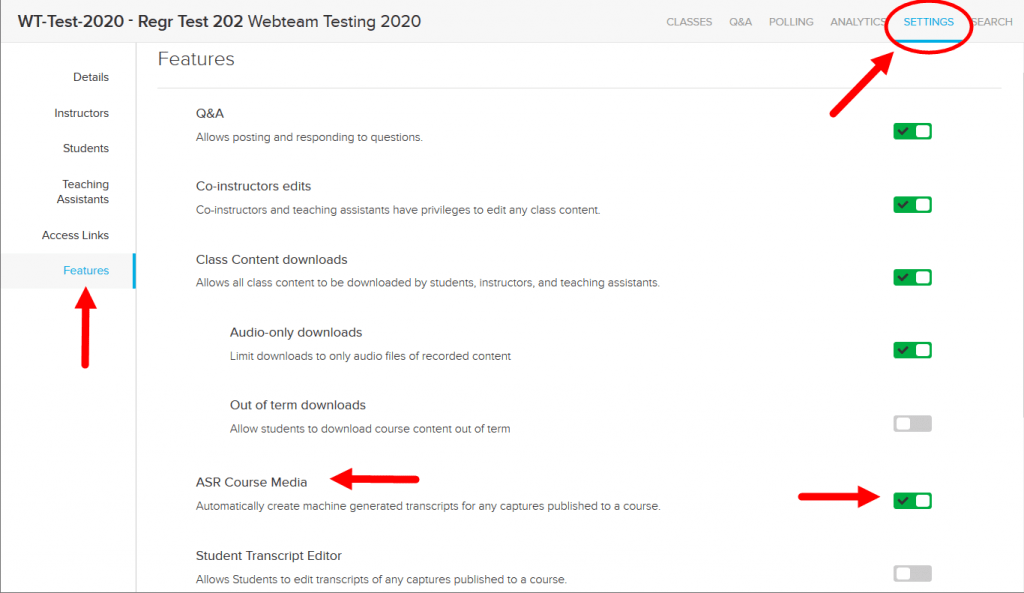
And last but not least, a recording with echo360.  This time the slide that I throw up to get live captioning leaves google out entirely.  This one I use MS Powerpoint for the live captioning.  This would have behaved the same way in Zoom.

One of the nice things about echo360 is that the viewers can decide how big some of the components are (using the Source pull down option), so it is possible to give those automatic captions a bit more window real estate for easier visibility.

Keep in mind, that the automatic captions in a recording are visibly seen, as I showed in Zoom and echo360, but are not screen readable.  The post processed captions or transcripts are screen readable.  On the other hand,  the Google Meet recording does not show them at all in the recording and has no post process ASR capability built in.

Final break down:

Google Meet Zoom Echo360
live captions Yes Yes* Yes*
live captions visible in recording No Yes Yes
streams live Yes Yes Yes
records For now Yes Yes
ASR post process No Yes when recorded to cloud Yes if turned on
*If used with another application such as Google Slides or MS Powerpoint and the screen is being shared


**  Don’t be hating on my COVID-19 pants!

FYI –

Just an FYI…

Adding someone as a guest to your Blackboard course, DOES NOT give them access to your Zoom meetings.   This is not a work around for bringing guests into a zoom session.


SUNY Virtual Symposium on Adaptive Learning


Someone wrote me and asked what Adaptive Learning was.  Her is my quick answer:

“The idea of Adaptive Learning, is that there is a program monitoring the understanding/progress of the student, that can shift what their next course of action is (a reading, or quizzing, etc) based on performance.  So it has built in remediation, and possibly acceleration, depending on the actual platform.  Some of them are made by for profit publishers, and some work largely with open educational resources and funding from grants. They make an interesting case [as a tool] for helping students meet course objectives in a remote environment.”


“Connection is not private” or “Certificate error”

This can be caused if your OS and/or browser is out of date.

For specific recommendations, please visit this DoIT page.


Creating a VoiceThread Assignment that is tied to the Blackboard Grade Center

To create a VoiceThread Assignment, you will go to Build Content -> Mashups -> VoiceThread.
Make sure to enable Grading.
Screen Shot 2020-04-30 at 9.05.25 AM.png
If you forgot to do this part, you will not see the Assignment Builder option in the next step.  You can go back and enable grading if you need to:
1. Edit the VoiceThread link that you’ve already built in Blackboard.
2. Scroll to the grading section and make sure that “Enable Evaluation” is set
to “Yes.”
3. Set the number of points your assignment is worth.
4. Save.Now Click Assignment Builder.

Screen Shot 2020-04-30 at 9.06.56 AM.png
.

After you click on Assignment Builder you will have options of VT assignment types:

This is the Create a VT option:
Notice the option to allow resubmitted assignments
This is the Submit a Comment VT assignment option:
Note the name of my assignment is VT test.
The watch a VT assignment looks much the same where you have to select the already built VT (or create a new VT that you want them to watch).
The Grade Center won’t show that something has been submitted, but as soon as
you enter the grade into the VoiceThread assignment, that grade will be passed
back to Blackboard for you automatically.

Image not Appearing in Test?

This is from the Bb listserv.  I thought it might be of interest.


…yesterday we had an instructor report that students could not see images in
test questions, but they could. After extensive testing, we discovered that
if the ‘Display Until’ date has passed, the images will no longer appear.In our situation…
Due to a recent issue of students cheating, the instructor set a 10 or 15
minute time window where students had to start the test.They did this by
using the ‘Display After’ and ‘Display Until’ settings. The test was
setup to present/display “One at a time”. When the ‘Display Until’ date
passed, the images no longer appeared in the test. The test continued to
function as normal and the text is all there, just the images do not
display and instead a broken image icon displayed. If the ‘Display Until’
date was changed to in the future, the images reappeared.

I submitted a support ticket to Bb Support and after submission it gives
you potentially related articles. One of those was a Nov 06,2015 “Article
No.- 000041338- Assessment Images and Other Attached Files Cannot be Viewed
While Inside a Test After Display Until Time”:
https://blackboard.secure.force.com/btbb_articleview?id=kA3700000004EdO

So our particular issue has been around for a while and doesn’t appear is
planned to be fixed anytime soon.

Jeffrey Ries
Applications Administrator/LMS
IT-Educational Technology & Media Services
University of Northern Iowa, Cedar Falls, Iowa

All Those Test Options in Blackboard & How to Give a Synchronous Test*

This blog entry is going to focus on the options in Blackboard that have to do with the timing of an test.

When you are first creating the Test.. these options are found under the Test Information area and span a few sections.  If you have already made the test you can find these options by clicking the chevron next to the test name and clicking “Edit the Test Options”.

Force Completion


When you set this option, if the student looses the connection or accidentally closes the browser, they will be unable to go back and finish the test. (Without you having to intervene anyway.)  We don’t recommend enabling this setting.

Set Timer

This option gives the student a visible countdown timer during the test. It begins after the test description and instructions have been displayed. If Auto-Submit  is selected, at the end of the count down, it ends the test, no matter where they were.  If Auto-Submit is not checked, you will see an exclamation point in the grade center and have the option to adjust the grade, if they went long.

If the Force Completion is not set, and a student looses their connection or accidentally closes the browser, they will be able to continue taking the test, and the timer will continue from when it initially started. (eg., If they loose the connection for 10 minutes, they loose that 10 minutes.)

Display After and Until

A better way of handling whether students can see the test, rather than the “Make the Link Available” option.  Also consider, they can’t start what they cannot see.  *So if you want everyone to be done by 1pm and you have a 30 minute timer with auto-submit enabled, consider Display Until to end around 12:30. 

Due Date

Due dates (and times) do not affect the test availability (unless you choose the Do not allow students to start the Test if the due date has passed option), but rather provide a flag on the test if it was started or ended after the due date/time.

Test Availability Exceptions

This section allows you to make test rule exceptions for people that need accommodations, or have other needs depending on language or technology situations.

If these settings exist for a test or survey, you can create these exceptions:

  • Number of attempts
  • Timer
  • Availability: Date and time the test is available to the student or group
  • Force completion
  • Restrict location


Have any interesting testing stories to tell?  What other testing options do you have questions about?  Please comment below!

This blog is a cross post from https://you.stonybrook.edu/academictechnologyservices

“Force Completion is one of those functions that sounds like it will be useful, but really is just a way of going swimming in cement boots.”

Accepting Videos as an Alternative form of Course Assessment

This is about using a echo360 mashup tool to accept video submissions inside of Blackboard and which instructor will be able to grade under Needs Grading in the Grade Center.  This is an excellent alternative to high stakes grading via traditional exams.

First you will want to create an assignment. You will go to your Assignments area and go to Assessments -> Assignment.

Give it a name and add instructions for the students to follow.

Create a due date and points possible for the presentation.

Make the assignment available to the students.

Submit.


What the students see:  (You can also see this yourself using the student preview mode, entered by clicking on this icon in the upper right part of the screen in blackboard:

Under assignments, they locate your assignment and click in it’s name.

They see the points possible and the instructions that you wrote previously.

They need to click on Write Submission to get to the Blackboard WYSIWYG editor. They should type the name of their assignment into this text box and then select the Mashups button.

Then they click on Mashups -> Echo360 Video Library

This opens a new window for them where they have three choices.    They can choose any video already in their echo360 video library. (That is Choose From My Home), they can create something new (Create New Media) or Upload a video they have on their computer. This is what the different options look like:

Choose from home allows the student to either browse or search for files in their echo360 library.

Create New Media will give them the option to Launch Universal Capture from their computer.

Where they can name the video and start recording from their webcam, desktop and audio.

and finally Upload Existing:

Here they can grab videos from their cloud storage locations or browse from their computer.

After they have typed the name of their presentation and selected the video, they will click submit.

After submitting they will get a submission confirmation:

As the instructor, you can find the student submission under Needs Grading in the Grade Center:

…where I will see the list of submitted assignments and I can either chose Grade All or go through them one by one.  Here is the assignment I submitted and you can view the presentation, grade it and leave feedback for the learner right here.

Creating, Crafting, Sustainability

Skip to toolbar